If you decide to buy a Tesla, any Tesla, please consider using my Referral Code: https://ts.la/doug93556. You’ll get a US$100 Supercharger credit and I’ll get something, too. Thanks!
Tesla Model 3
Floor Mats
The carpeting material in the Tesla Model 3 premium interior is rather flimsy. It doesn’t have the feeling of a fabric that will hold up to much wear and use. So I went on the hunt for floor mats and settled on two sources.
For the passenger-compartment floors (front and rear) I selected the 3D MAXpider mats for US$205. There was (and currently still is) a wait, but I did receive them within the timeframe I was quoted.
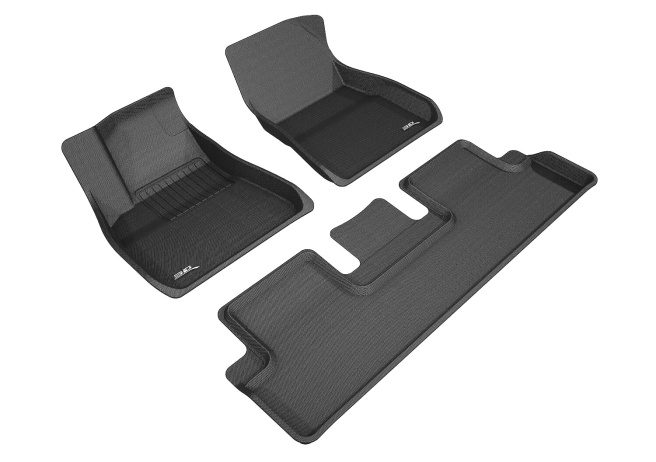
These mats aren’t plush. They’re fairly hard rubber, textured and sculpted to fit perfectly and with raised edges so the mats can actually constrain dirt and liquids. They’re very lightweight and stiff, so you can easily lift them out to just hose them off. I didn’t like the “3D” logos, so I (easily) removed them, although that leaves a dimple in the material. I prefer that to the glossy logos. I like these even more than I expected.
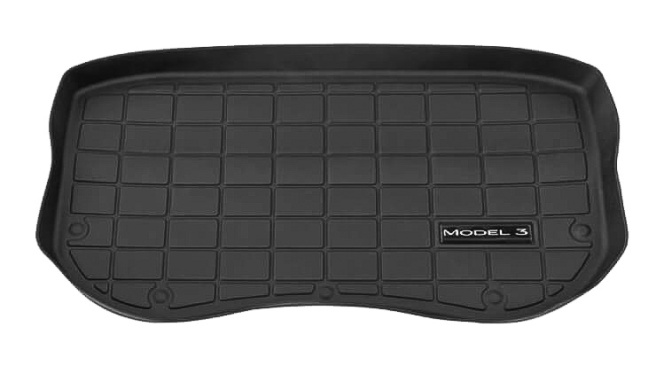
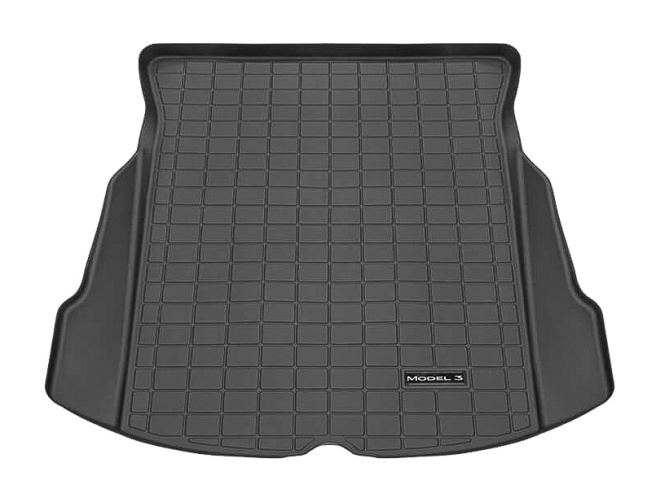
For the trunk and frunk, I decided to purchase the Tesla mats for US$130 and US$70, respectively. Like the MAXpider mats, these have raised edges and are lightweight and easily removable. For some reason, these Model 3 logos didn’t bother me, so I’ve left them on. The trunk mat has a notch for the loop that allows you to easily lift the hatch covering the deep storage well in the rear.
Both sets of mats are highly recommended. US$409 total, plus taxes and shipping (if any).
Kenriko’s Wraps
As much as I love my new Tesla Model 3, there are a few cosmetic things that cried out for modifications. And given that I wasn’t able to even drive the car for its first two months due to an injury, I spent much of that time making various “improvements”. Many of the mods are in the form of vinyl wraps, described below.
I searched the internets for options and finally settled on the vinyl-wrap kits from Kenriko, sold on Amazon.com. He’s a guy with a day job, so there are some delays in his updating Amazon’s inventory as well as fleshing out the options such as different materials (matte black, carbon fiber, etc.). The kits are very reasonably priced, all below US$30. Kenriko is very active (and responsive) on the Tesla Motors Club forum.
Center Console
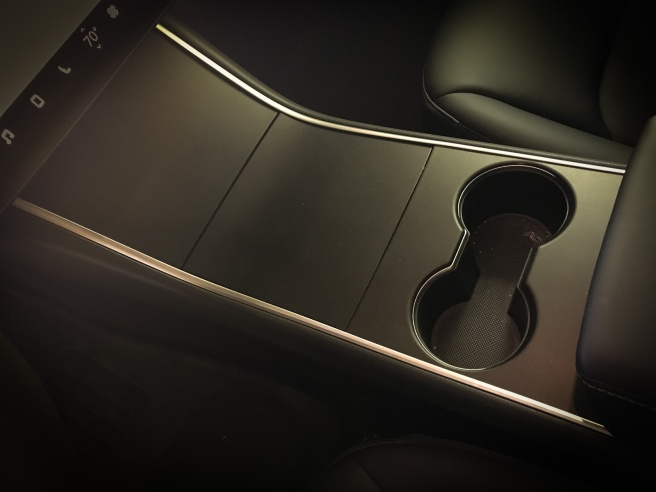
I began with the center console. Like almost everyone I’ve spoken to, I found the stock glossy black finish to be a disaster. It shows every fingerprint, scratch and speck of dust. I considered carbon fiber and other vinyls, but ended up going with Kenriko’s Avery 900 Matte Black kit. (See his installation video.) Why the Avery matte black? Kenriko says (and he’s right) that the 3M M12 Matte Black scratches very easily. The Avery product (in this particular case) is more durable. But my main reason is that it looks so good with the dark Alcantara upholstery. It’s a DIY wrap, but I cheated. I had Juan Gomez install it when he wrapped the exterior of the car. Juan does a much better job of this than I do.
Door Switches

After getting the car back from Juan, I decided to tackle the door switches myself. For this one, I bought Kenriko’s 3M 1080 Matte Black kit. (Installation video.) Yeah, I know I just wrote that 3M Matte Black scratches, but it seems okay on the door switches, which aren’t as vulnerable or obvious as the center console. After installing the wrap, I decided to swap out Kenriko’s door-open buttons for glossy yellow vinyl. I originally hand-cut the pieces using Kenriko’s originals as templates. More on this later. (Original post with more info at https://goo.gl/c7Kuva.)
My Own Vinyl Cutter
Not only does Kenriko sell kits on Amazon.com, he also uploads free, open-source templates to github in both .ai (Adobe Illustrator) and PDF formats. You can easily download the PDF versions and then hand-cut your own materials, but some of the cuts are small and tricky. For best results, you’ll want a true vinyl cutter. Also consider that the cost of the vinyl is almost as much as buying one of Kenriko’s complete kits, so if you can live with the materials he offers, you’re better off just purchasing his kits.
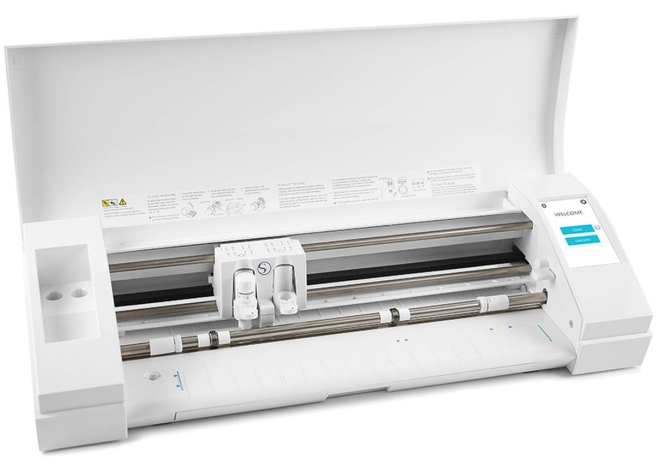
I decided I wanted to do more of this type of modification, so I decided to dive into the world of vinyl cutters. After a bit of research, I settled on a Silhouette Cameo 3 cutter. Yeah, I know US$200+, plus the materials — I could do all of this for far less by just buying kits. But hey…I didn’t say any of this was rational!
I then purchased a variety of vinyls including:
The standard Silhouette Studio software, which is free with the cutter, won’t open Adobe Illustrator or PDF files. For that, I upgraded to the Designer Edition. That’s US$49.99 if purchased from Silhouette, but I discovered you can buy it from Swing Design for US$20 less. The PDF files work fine as-is, but at the time I wanted to tackle the next project (door sills), Kenriko had only uploaded the Adobe Illustrator file to github.
Not wanting to pay monthly for Adobe Illustrator, I downloaded the free, open-source app, Inkscape instead. For my iMac, this also required X11, so I downloaded and installed XQuartz. At first, I tried opening the .ai files in Inkscape and saving as SVG files, then opening those in Silhouette Studio. That resulted in some scaling errors. Instead, I ended up exporting to PDF from Inkscape and opening the PDFs in Silhouette. Scaling correct!
One of my first self-cut projects was to replace the little yellow door-opening buttons (see above) with ones that have cleaner edges.
Door Sills
Armed with my trusty Cameo 3, I was ready to tackle the next project: door sills. Kenriko did the hard part, designing a template to cover the front-door sills with cutouts for the “MODEL 3” text. But I wanted two things he didn’t offer: Matrix Black vinyl — Carbon Fiber is more popular, but I like the matrix look better — and red lettering.
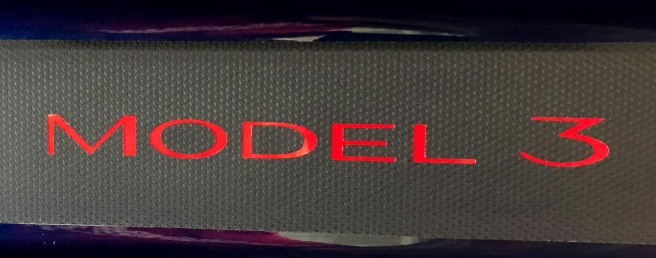
I downloaded Kenriko’s template in Adobe Illustrator format. I then made two versions: One just as Kenriko made it for the Matrix Black overlay, and another for the Gloss Dark Red vinyl that covers the full area but is just a bit undersized: about 2mm all around. I exported both in PDF format, opened them in Silhouette Studio, then cut the vinyl. The Matrix Black is quite a bit thicker and tougher than the red vinyl, so I had to run a few tests to get the settings right.
No, there isn’t normally a door-sill plate on the rear doors. This is a Kenriko “extra”.
What’s Next?
I’ve got at least two more wraps in the works: I want to cover the wood dashboard strip in Matrix Black and portions of the steering wheel in Matte Black, like the center console. I plan to wait for Kenriko to upload templates for these mods, since he does all that work with more care and patience than I’m likely to use. I plan to update this post once I’ve got those done.
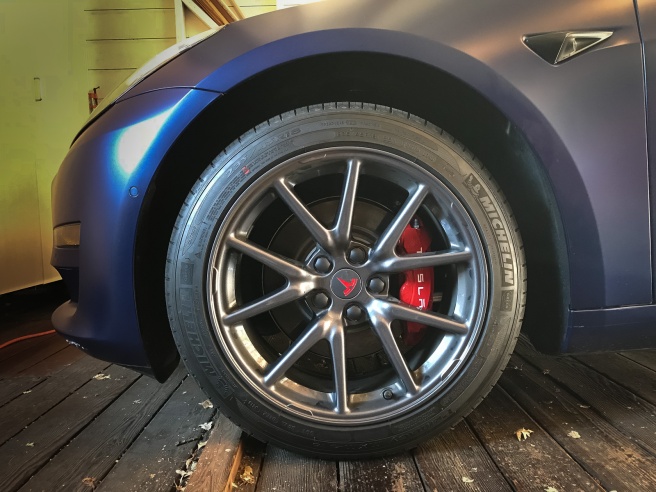
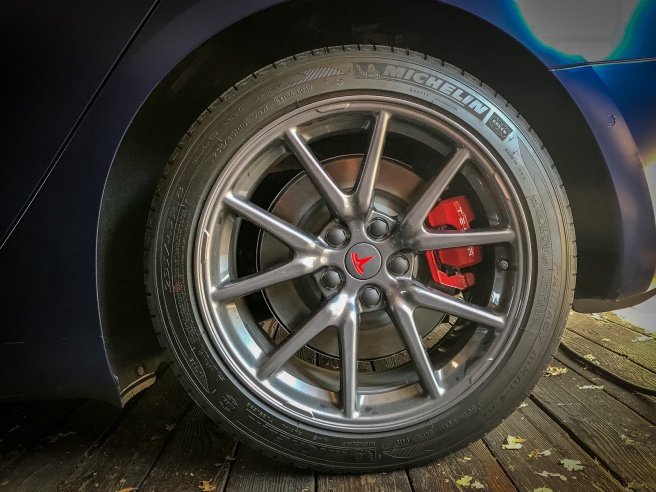
Red Brake Calipers
I’ve always liked the look of bright red brake calipers behind good-looking wheels. Even before I got my Tesla Model 3, I knew I wanted red calipers. I researched the options and found these:
- Unplugged Performance offers a complete replacement for rotors and calipers for $9,000. Beyond my budget.
- T Sportline in the Los Angeles area will paint them for you for $1,200. Still more than I wanted to pay. And I don’t live near L.A.
- EVANNEX sells a set of red caliper “covers” for $290. They look okay, but it’s a weird way to get the results. And even still a bit pricey.
- ForMyTesla.com offers a DIY kit of epoxy paint and decals for $79. Now we’re talking! (Their website is a mess. As of writing this, I could only get there via ForMyMercedes.com since the ForMyTesla.com link wasn’t working at all in my browser. Others don’t seem to have a problem with it however.) Note that if you don’t want the “Tesla” decals, you can buy the exact same kit for 1/2 the price at many places.
Needless to say, I went with the least expensive option.
Of course, any project like this is nothing more than an excuse to buy tools, and in this case the tools cost well more than the project itself. In my case, I needed the following to do the project. All but the last were found at the local Harbor Freight store:
- 21mm socket with 1/2″ drive – $3.99
- Breaker bar to remove the lug nuts – $12.99
- Torque wrench, up to 129 foot-pounds – $19.99
- 3-ton low-profile hydraulic floor jack – $129.99
- Wheel chocks – $7.99
- Jack adapter – $35. If the URL doesn’t work, search eBay for “Tesla Model 3 Jack Pad Adapter Lift Point Pad”.
Total for the project: $288.18 plus shipping and sales tax. Same price as the EVANNEX option and I end up with (a) better results, and (b) tools I will use in the future.
The jack adapter is very important. There are only four specific points at which you can jack up your Tesla Model 3 unless you want to start removing panels from beneath the car to expose suspension points at which you can support the 2-ton vehicle. Even then, those would be the “unofficial” points at which to lift the car. Plus, without a full lift or jack stands, I prefer not to work underneath a jacked-up car. You might be able to lift the car from one corner high enough to place a jack stand under the other point on the same side, but even then I’d need four jack stands and three more adapters. So I decided to do one wheel at a time.
Here are the steps I took:
- Chocked the wheels on the opposite side.
- Used the breaker bar to loosen the lug nuts.
- Jacked up one wheel using the adapter.
- Removed the wheel.
- Used the spray cleaner provided with the paint kit to clean the caliper.
- Masked off areas not to be painted such as the disk, pads, dust cover, etc.
- Mixed 1/4 of the red paint and the epoxy “activator” using disposable eye droppers and a paper cup, neither of which are included with the kit, which is designed to be mixed and used all at once. You can use it for two hours before it cures.
- Painted a first coat using a disposable 1″ foam-rubber brush (the kit includes just one brush).
- Waited 15 minutes, then applied a second coat.
- Waited two hours, then installed the decal.
- Sprayed a protective coating (to keep the decal from rubbing off during washing) using some stuff I had in the house.
- Reinstalled the wheel.
- Waited 24 hours before driving.
The jack adapter has a magnet that holds it in place to the frame of the car. That’s great, but it’s too easy to forget about it after you lower the car. I solved this by attaching it to the jack using a piece of string so that when I remove the jack, the adapter always comes off with it.
[Note: I think the jack adaptor is a great thing to keep in your car in case you need roadside service, etc.]
The kit from ForMyTesla.com was excellent. Good quality materials, good instructions and a fair price.
Because of the two-hour wait before re-mounting the wheels, this takes eight hours, plus the 24-hour wait before driving. Or spread it out over two days like I did. It’s actually less than one hour of work time per caliper.
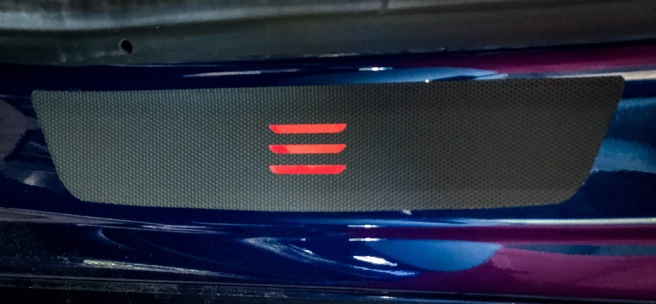
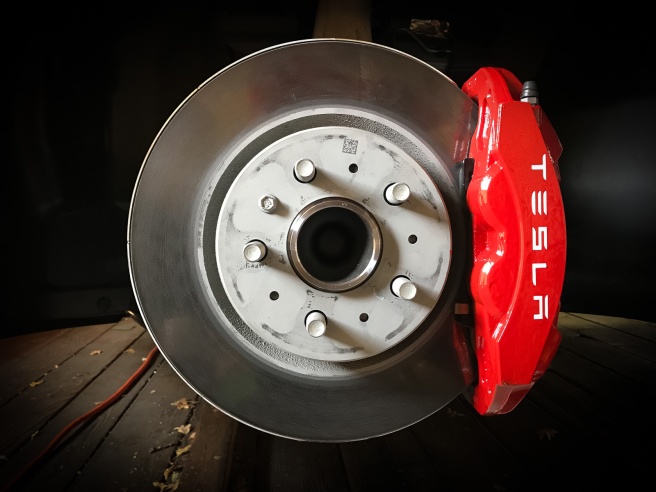
Oh yeah…what about that red logo on the wheel hub? First of all, these are the standard 18″ wheels with the aero covers removed. I added Tesla’s Aero Wheel Cap Kit for $50. Then I finished it off with the red T-logo decals from Tesla Pride ($9.75 from Amazon.com).
Front License Plate Holders
The Tesla Model 3 comes with a bracket for attaching a front license plate. It’s a simple gadget you affix to the front of the car using an adhesive. There’s just one problem: the car has very nice front-end lines that are ruined by attaching the plate. At least in my opinion and those of many others.
Here in California, a front license plate is required. You can get a “fix-it ticket” for $114. Supposedly — I haven’t tried it — you can then attach your plate, take it to the DMV (or perhaps any local police department) have them inspect the vehicle, and have the ticket reduced to $20. From what I hear, most of these tickets are issued by parking-meter patrols.
I’m not planning to permanently attach my front plate, so to prepare for receiving such ticket(s), I went looking for the best removable front license-plate frame. Here are some I found:
- The Law. $134.99 from Torklift Central (or at a higher price from elsewhere). It’s “designed for no-touch carwash only”, which is probably true for most or all of these options. My #1 concern is that the plate is mounted in front of the grille. And while the Model 3 doesn’t have a traditional (engine) cooling system, it does have a radiator and coolant system for the main batteries and MCU (computer).
- Sto n Sho. $94.99 from Big Mikes Performance Parts. I liked the price and the fact that the plate is so easy to remove. However it requires drilling into the underside of the bumper cover (not too big a deal), but also that it extends about an inch below that bumper cover. I’m already scraping the ground when I drive into my garage. This would make that much worse. Plus, like The Law, this bracket blocks the grille.
- Platypus. $93.00 from CravenSpeed. This is a pretty good solution. The plate is easily removable and when on, it doesn’t block the air intake. It looks a little weird, being mounted off to the side. But if your goal is only to attach the plate for the sake of an inspection, this might be the best (and least expensive) option. The Platypus attaches to the tow-bolt, which on the Model 3 is on the far-left (driver’s) side of the grille. CravenSpeed claims it blocks neither the cooling nor the ultrasonic sensors. And it has a quick-release feature. But did I mention that it looks a little weird?
- Evannex. $99.95 from Evannex, who also sells The Law, but at a higher price than Torklift Central. This is a very simple device. It uses adhesive to attach to the front bumper cover, but like The Law and the Sto n Show frame, this one blocks the grille. Another no-go for me.
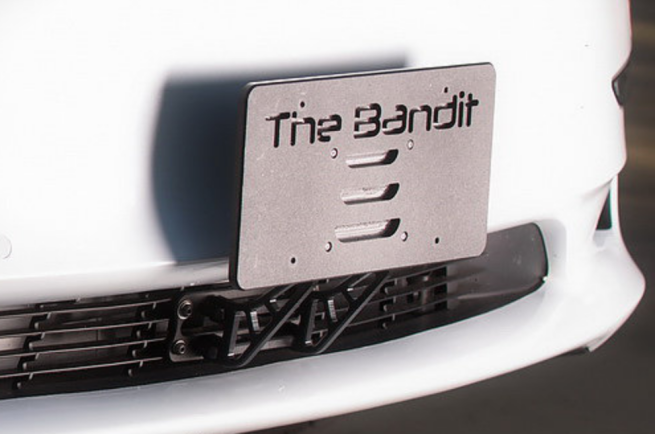
- The Bandit. $119.00 from 1975 Creations. This is the one I ended up buying and so far, I’m glad I did. First of all, The Bandit doesn’t block the grille or any sensors. It bolts onto the grille, but has arms that reach upwards, positioning the plate above the grille in the same position as Tesla’s own adhesive mount. Second, it’s centered so it doesn’t look weird. Third, it’s removable, although not as easily as The Law, Sto n Show or the Platypus. Still, it’s easy enough to remove and replace and I appreciate the quality of the CNC-machined materials, the quality of the attachment hardware and the completeness of the package including tools.