My Tesla Blog

IMG_5380.jpgMy 2018 Tesla Model 3

It’s been more than two years since my last blog post. So why now? And why Tesla? The short answer is that while stuck at home recovering from a nasty automobile accident, I’ve learned (and continue to learn) quite a bit about the new Tesla Model 3. I have pages upon pages of notes that I’ve decided to re-purpose as an ongoing series of blog posts and articles.

The detailed introduction…

With the rapid growth of social media, the popularity of blogging has steadily waned. Two years ago, all my posts were about photography. Occasionally, I posted a long-form article about something I’d learned, but most of the posts were in conjunction with my YouTube and audio podcast photography gear reviews, first on All About the Gear (on the TWiP network) and then with Gordon Laing on the Cameralabs Photography podcast. Over time, YouTube became increasingly important, and interest in the blog versions of my reviews — really not much more than links to YouTube — slowly faded. And besides, I’ve been so busy with the reviews and with teaching photography, Lightroom and Photoshop, I didn’t have much to say.

For the past three months, my wife and I have been recovering from a head-on car crash. Our injuries were quite serious: broken necks, broken sternums, broken ribs and (in my wife’s case) a badly broken wrist. The accident was May 4, 2018. I’m still confined to a cervical collar and my wife’s wrist is still in a cast. Bottom line: although we’re healing, neither of us can drive so we’re remarkably homebound and getting bored and grumpy. But we’re seeing the light at the end of the tunnel. My need to do something probably encouraged my return to blogging.

Okay, so back to Teslas…

On March 31, 2016 I, like many others, put down a $1,000 deposit on a Tesla Model 3. I had previously driven a Model S and even had a deposit on a Model X. But I was never happy enough with either of these cars to buy one. Sight-unseen, however, I was pretty sure the Model 3 would be the right car for me. So I waited. And waited.

Knowing that I’d soon be able to place an order or request a deposit refund, I rented a local Model 3 in March via Turo. No way I was going to order a new car without having driven one and Tesla had no demo cars for test drives. I loved it and placed a firm order as soon as Tesla notified me I could. So I waited.

Our accident was May 4. Eight days later I was released from the hospital, but was told I’d be in the collar and out-of-commission for at least 12 weeks. Sure enough, just two weeks after getting home I got the call from Tesla. “Your car is ready. You and your wife must both sign the documents and you need to pick it up here in Fremont [60 miles away] in two days. Otherwise, you’ll forfeit your deposit and lose your place in line.”

I explained our situation — we could barely walk — and said there was no way we could be in Fremont in two days. The rep said he’d get back to me. I posted our dilemma on social media, where a few thousand people read about it and hundreds left comments.

The next day, the rep called with the news that his manager had a change of heart. Instead of our traveling to Fremont, Tesla would now deliver the car to me, at my home and my wife didn’t have to sign the documents after all. “How’s tomorrow?”

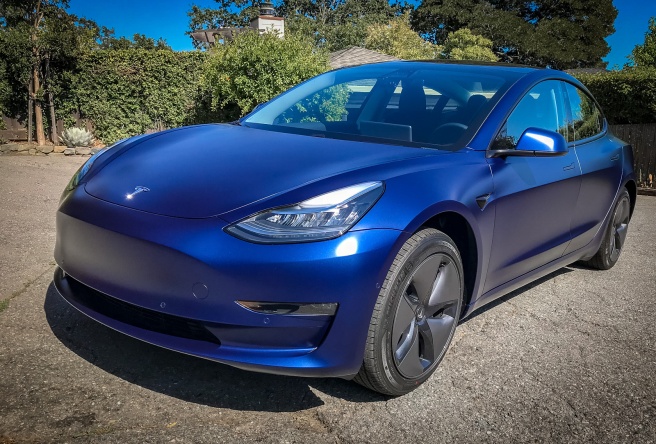
On May 30, 2018 I took delivery of a gorgeous Deep Metallic Blue Tesla Model 3 with 66 miles on the odometer. The Tesla employee who delivered it, took Uber back to Fremont.

If you’ve ever been stuck at home for an extended period for health reasons, but been in pretty good shape overall, you know how bored and anxious you become. I can’t go places without rides from friends, Uber or Lyft and because we live atop a hill that’s too steep and long for me to walk up, I’l relegated to sitting at home in front of screens. And you know what that means: web browsing and shopping!

The Model 3 is sitting in the garage with just 247 miles on it (none of them driven by me) after two months. But it hasn’t been neglected. The car has been wrapped in vinyl, ceramic coated, outfitted with a fancy new front/rear dashcam and generally been adorned with almost every possible aftermarket add-on from decals and “performance” pedal covers to floor mats. The only thing that has saved me so far is that the car is relatively new and a lot of aftermarket accessories haven’t been released yet. If it’s available, I’ve probably bought one.

In the blog posts to follow I will document some of the many things I’ve learned about the Tesla Model 3. There’s nothing new here, but I hope to present it topic-by-topic with plenty of links to other sites so that these blog posts become a valuable resource for you and for me. Hope you enjoy it.

TechArt Pro Review

techart

[Originally published on SonyAlphaRumors.com.]

This post is ostensibly a review of the TechArt Pro Leica M-mount to Sony E-mount lens adaptor, but I’ll start with a bit of the story as to how I came to be interested in such a device.

During the first year of All About the Gear I reviewed the Leica M 240 camera. I was particularly impressed with those expensive Leica lenses we’ve all heard so much about. I was less impressed with the $7,000+ camera body, which I swore I’d never buy. But those lenses! Sharp, contrasty, small, light…gorgeous. Continue reading

Cuba Workshop, January 2015

At 12:05am on January 16, sixteen photographers and their partners were the very first Americans to land in Havana under the new rules announced in December by President Obama. There was no fanfare, just the usual midnight airport skeleton crew that took two hours to x-ray our bags. One of us did get “special treatment” for arriving with enough gear for a feature-film crew and what could have been mistaken for a suicide vest. For most of the group, it was everyone’s first visit to Cuba.

Continue reading

A New Backup Strategy

I’m about to run out of disk storage for my Lightroom image catalog, so in preparation for a new iMac — one that supports a Thunderbolt disk system — I’ve decided it’s time to upgrade my backup systems. This is a long blog post, but it thoroughly covers what I’m now using for backup and what I learned in the process of getting to the final result.

My Former Backup Scheme

My backup strategy for the past three or four years was “pretty good”. My first-level backup was from my iMac to an Apple Time Capsule via Time Machine. For the second level, I made two copies at the end of every month of each of my internal SSD and 2TB rotating drive to two pairs of portable USB drives. Why two sets of removable backups? One set I kept off site in a storage locker. The other set I kept here at home for two reasons: (1) I’m actually paranoid enough that I wanted one set always off site (i.e., not in-transit) so I took a new set to the storage locker each month and only then retrieved the previous month’s set. Otherwise I’d have both the old and new sets at home simultaneously; (2) Although I’ve never had to recover from a major disaster like fire or theft, I have occasionally needed to recover a corrupted or accidentally deleted file. Having a full backup here in the house makes that very easy. Sure, I’ve got Time Machine, but I’ve had that completely fail on me and lost everything on the Time Capsule. Time Machine by itself is not an adequate backup solution.

New Backup Requirements

My new requirements are as follows:

  • 8TB of usable, local backup storage, updated multiple times/day from my iMac’s internal and external drives.
  • An identical server located at a remote location, replicated via the Internet daily and automatically from the local backup.
  • 12TB non-redundant Time Machine storage, separate from the above, for versioned files.

My Solution

After lots of research and testing, here’s what I’ve ended up with:

  • (1) Synology 214 DiskStation NAS (network-attached storage) server [US$300] with (2) Western Digital 4TB Red drives [US$175 each] configured as a single RAID0 (striped, non-redundant) disk group in a single 8TB volume for the local backup, connected to my iMac via Gigabit Ethernet.
  • An identical system to the one above, but located at a remote location and linked to the first one via the Internet. This is like having my own remote cloud server.
  • Carbon Copy Cloner [US$40] app for backing up the iMac drives to the local NAS server.
  • A 16GB USB 2.0 flash drive [US$9] as an OS X Recovery Drive.
  • Total cost: US$1,349, which doesn’t include my Time Machine storage.

I sync each of the two drives in my iMac to a separate shared folders on the local NAS backup server every six hours using Carbon Copy Cloner. Once a day, at midnight, I then replicate the shared folders on the local and remote backup servers using Synology’s built-in shared-folder syncing. I’m storing the files on the NAS servers in sparsebundles, the same format used by Time Machine. The synchronization uses the standard rsync utility, which transfers only disk blocks that have been modified since the last pass.

I don’t recommend this solution for beginners. I’ve got quite a bit of experience configuring and managing Linux servers, so these DiskStations are almost like old friends to me. Synology has done an excellent job in making their servers easy to setup and manage, but I still think it would be a bit scary and frustrating for someone who wasn’t already familiar with Linux and disk/file servers.

Intermission: If all you care about is the solution, you can stop here. But if you want to understand why I’ve settled on this solution for backup, and the tests and considerations that went into making these selections, read on!

Continue reading

Sony RX100 MKIII

Sony updates its very popular RX100 MKII with a new third version. The camera is already being heralded as the best-ever compact or point-and-shoot. But at $800, it’s also the most expensive. The new model touts a cool pop-up electronic viewfinder (EVF) in lieu of a hot shoe, and an excellent new lens that mimics a fast (f/1.8-2.8) mid-rage 24-70mm (full-frame equivalent) zoom. The image quality is great, but at that price, Frederick Van Johnson and I ask, “Who’s this for?”

Sony a7/a6000 Intervalometer Hack

Update: It appears this entire project is no longer necessary. When I did this a few months ago, no one was offering an intervalometer for the Sony Multi-Terminal port. Now it appears there are some out there: http://goo.gl/Iy4zMJ

One weakness of the Sony a7/a7r/a7s and a6000 ecosystems is the lack of an intervalometer. There are a few options like TriggerTrap, but that and some others depend on a mobile phone, which seems unnecessarily complex and unreliable. There are a number of videos and articles demonstrating how to combine a Sony remote and an inexpensive intervalometer, but they don’t provide enough detail for those who don’t want to experiment. Here are the step-by-step instructions.

1. Get the parts.

I used a Sony RM-VPR1 wired remote and this intervalometer. You’ll also need some two-conductor narrow gauge wire (~22 gauge works), a soldering iron, and optionally a connector if you want to be able to use the remote without the intervalometer attached.

DSC01925


(Not shown: the cable that connects the Sony remote to the camera.)

2. Disassemble the remote.

Four external screws and one that secures the circuit board to the case.

3. Cut a notch for the wire.

Use a small knife or drill to cut a notch into the rear of the remote’s case for the wire to pass through.

DSC01935
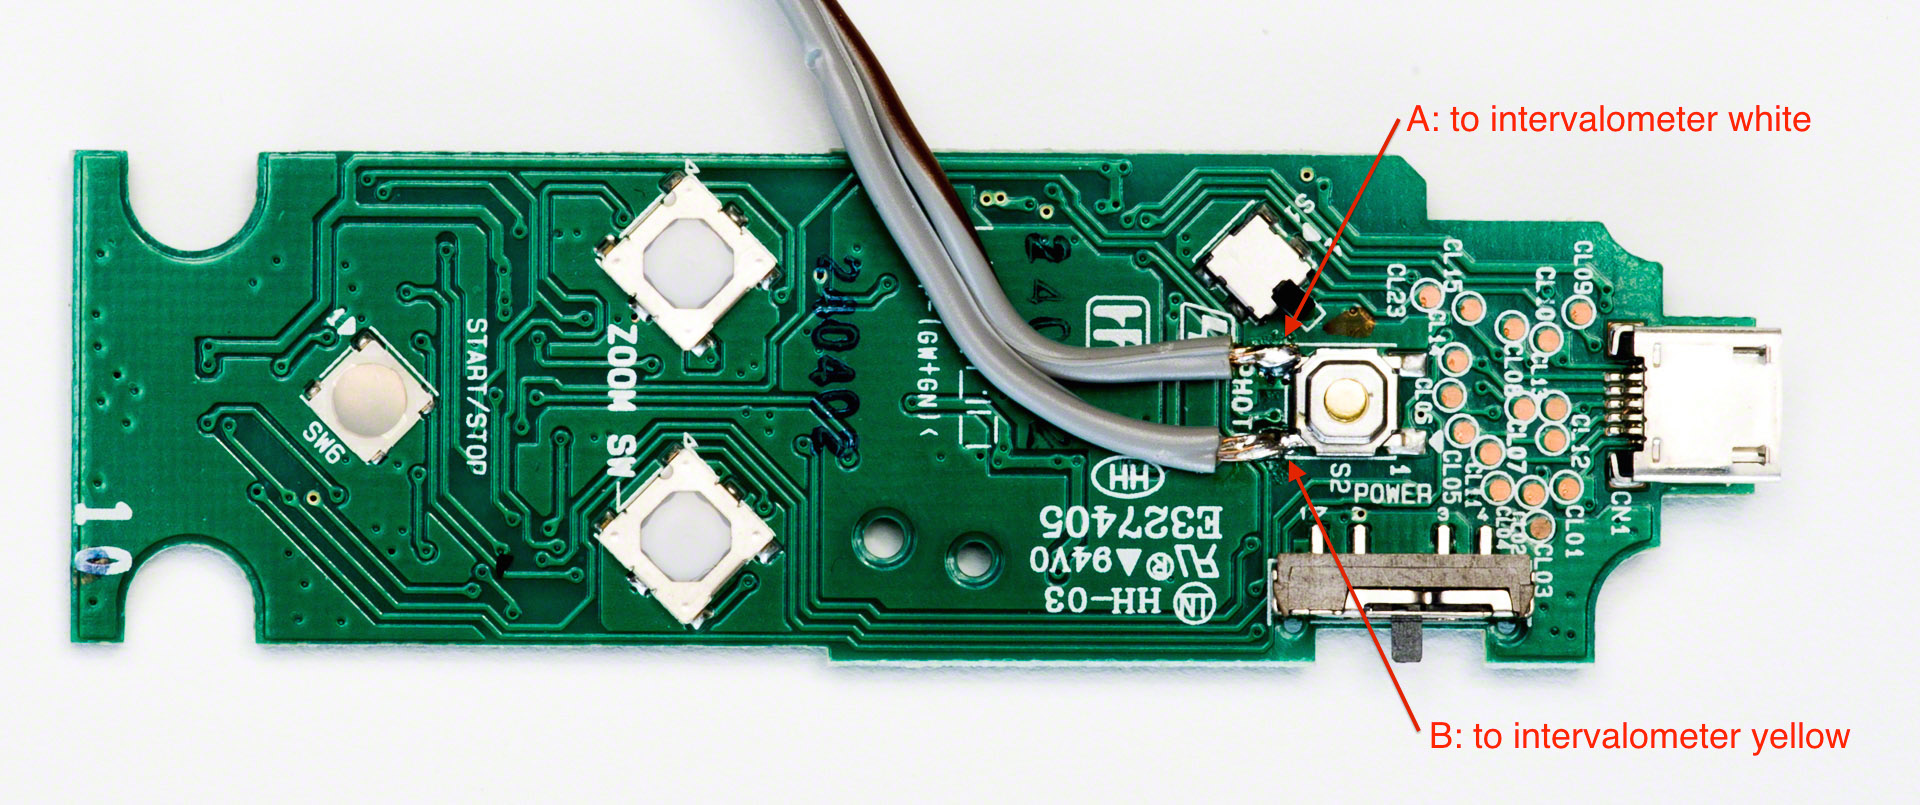
4. Solder the wire to the remote’s switch.

DSC01929

Solder the two-conductor wire to the remote’s main switch as shown above. (Click to enlarge.)

5. Cut the connector off of the intervalometer.

I left about 8″ of wire coming out of the intervalometer.

6. Use a connector to mate the intervalometer to the remote.

As shown above, the wire connected to point A should mate with the white wire coming out of the intervalometer. Point B should mate with the intervalometer’s yellow wire. (Polarity matters!) The intervalometer’s red wire is unused.DSC01932

I used a 3-conductor molex connector as shown above. Because I keep the two components connected all the time, I’ve secured the connector using cable ties as shown earlier.

7. Test!

Connect the remote to the camera. Both the remote and the intervalometer should be able to trigger the shutter. Don’t forget to enable the remote in the camera’s menus.

8. Reassemble the remote.

Route the wire through the remote as shown below. This will act as strain relief and won’t interfere with the operation of the remote’s buttons.

DSC01928That’s all there is. You should now have all of the intervalometer’s functions as well as the original functions of the Sony remote.

Sony a7s

The Sony A7s is being heralded as “Camera of the Year” by some reviewers, Frederick and I take a look at the third camera in Sony’s a7 series. While offering a sensor with only 12MP, the a7s is getting a lot of attention for a sensor that can shoot up to ISO 409,600 as well as being one of the first still-image camera that also produces 4K video.

Does it live up to all the buzz? And who really needs a camera that can shoot in the dark? And what about that 12MP sensor? Isn’t that really heading in the wrong direction? I explains why 12MP may be enough for you and why a high-ISO sensor may be important to everyday photography.

Panasonic Lumix GH4

The long-awaited latest Lumix “G” flagship camera breaks new ground: It can shoot 4K video and save it directly to an SD card. So this week we invited video guru Dave Dugdale to join Frederick and me to give us his two cents.

Dave and I put the GH4 through some very different paces. I wanted to see what would happen if he shot 4K video specifically with the goal of extracting still images. Check out how well the GH4 did in both our tests.

Sony a6000

The a6000 replaces Sony’s NEX-6 and at only $600 (body only, street price) you might think this is just another entry-level camera, comparable to a point-and-shoot. But you’d be wrong. Sony claims this is the world’s fastest autofocusing mirrorless camera and is now the top-of-the-line in their APS-C sensor line.

I put the a6000 through some serious usage tests including an intense week of shooting on the streets of New York City. And while Frederick and I lament the fact that Sony still doesn’t appear to understand the value of features like touch screens and external mic jacks, you’ll also hear whether I think the a6000 is a good choice regardless of these weaknesses.