As much as I love my new Tesla Model 3, there are a few cosmetic things that cried out for modifications. And given that I wasn’t able to even drive the car for its first two months due to an injury, I spent much of that time making various “improvements”. Many of the mods are in the form of vinyl wraps, described below.
I searched the internets for options and finally settled on the vinyl-wrap kits from Kenriko, sold on Amazon.com. He’s a guy with a day job, so there are some delays in his updating Amazon’s inventory as well as fleshing out the options such as different materials (matte black, carbon fiber, etc.). The kits are very reasonably priced, all below US$30. Kenriko is very active (and responsive) on the Tesla Motors Club forum.
Center Console
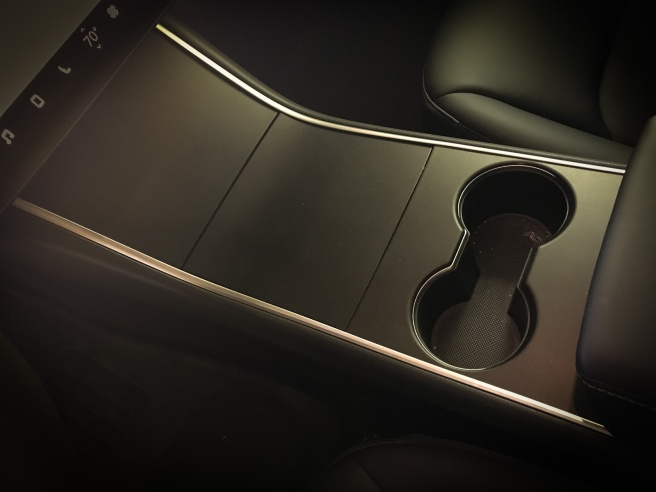
I began with the center console. Like almost everyone I’ve spoken to, I found the stock glossy black finish to be a disaster. It shows every fingerprint, scratch and speck of dust. I considered carbon fiber and other vinyls, but ended up going with Kenriko’s Avery 900 Matte Black kit. (See his installation video.) Why the Avery matte black? Kenriko says (and he’s right) that the 3M M12 Matte Black scratches very easily. The Avery product (in this particular case) is more durable. But my main reason is that it looks so good with the dark Alcantara upholstery. It’s a DIY wrap, but I cheated. I had Juan Gomez install it when he wrapped the exterior of the car. Juan does a much better job of this than I do.
Door Switches

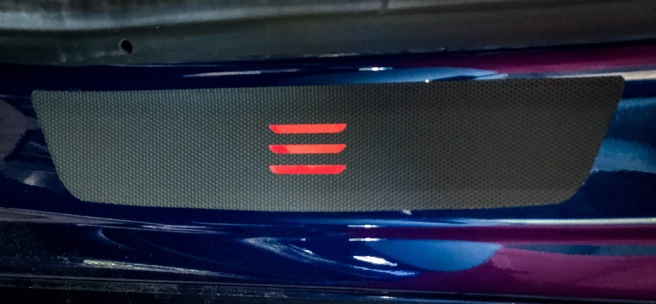
After getting the car back from Juan, I decided to tackle the door switches myself. For this one, I bought Kenriko’s 3M 1080 Matte Black kit. (Installation video.) Yeah, I know I just wrote that 3M Matte Black scratches, but it seems okay on the door switches, which aren’t as vulnerable or obvious as the center console. After installing the wrap, I decided to swap out Kenriko’s door-open buttons for glossy yellow vinyl. I originally hand-cut the pieces using Kenriko’s originals as templates. More on this later. (Original post with more info at https://goo.gl/c7Kuva.)
My Own Vinyl Cutter
Not only does Kenriko sell kits on Amazon.com, he also uploads free, open-source templates to github in both .ai (Adobe Illustrator) and PDF formats. You can easily download the PDF versions and then hand-cut your own materials, but some of the cuts are small and tricky. For best results, you’ll want a true vinyl cutter. Also consider that the cost of the vinyl is almost as much as buying one of Kenriko’s complete kits, so if you can live with the materials he offers, you’re better off just purchasing his kits.
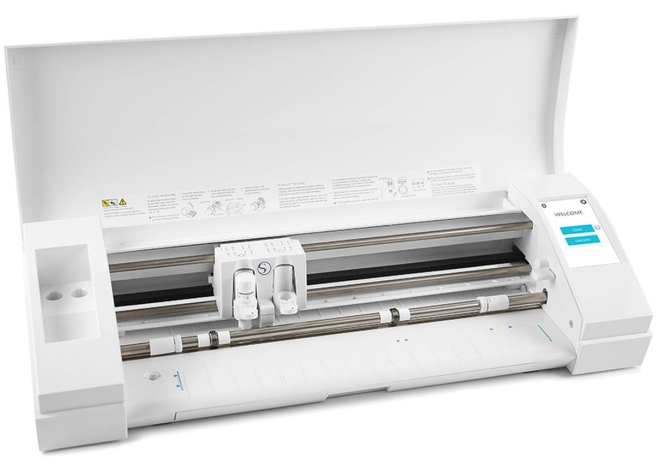
I decided I wanted to do more of this type of modification, so I decided to dive into the world of vinyl cutters. After a bit of research, I settled on a Silhouette Cameo 3 cutter. Yeah, I know US$200+, plus the materials — I could do all of this for far less by just buying kits. But hey…I didn’t say any of this was rational!
I then purchased a variety of vinyls including:
The standard Silhouette Studio software, which is free with the cutter, won’t open Adobe Illustrator or PDF files. For that, I upgraded to the Designer Edition. That’s US$49.99 if purchased from Silhouette, but I discovered you can buy it from Swing Design for US$20 less. The PDF files work fine as-is, but at the time I wanted to tackle the next project (door sills), Kenriko had only uploaded the Adobe Illustrator file to github.
Not wanting to pay monthly for Adobe Illustrator, I downloaded the free, open-source app, Inkscape instead. For my iMac, this also required X11, so I downloaded and installed XQuartz. At first, I tried opening the .ai files in Inkscape and saving as SVG files, then opening those in Silhouette Studio. That resulted in some scaling errors. Instead, I ended up exporting to PDF from Inkscape and opening the PDFs in Silhouette. Scaling correct!
One of my first self-cut projects was to replace the little yellow door-opening buttons (see above) with ones that have cleaner edges.
Door Sills
Armed with my trusty Cameo 3, I was ready to tackle the next project: door sills. Kenriko did the hard part, designing a template to cover the front-door sills with cutouts for the “MODEL 3” text. But I wanted two things he didn’t offer: Matrix Black vinyl — Carbon Fiber is more popular, but I like the matrix look better — and red lettering.
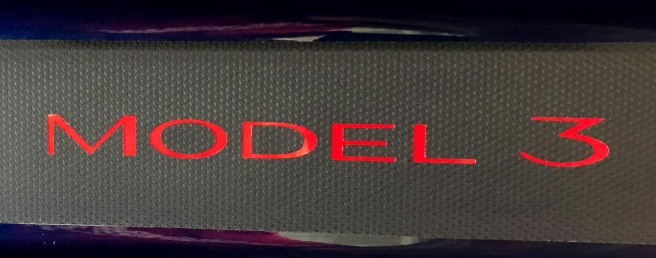
I downloaded Kenriko’s template in Adobe Illustrator format. I then made two versions: One just as Kenriko made it for the Matrix Black overlay, and another for the Gloss Dark Red vinyl that covers the full area but is just a bit undersized: about 2mm all around. I exported both in PDF format, opened them in Silhouette Studio, then cut the vinyl. The Matrix Black is quite a bit thicker and tougher than the red vinyl, so I had to run a few tests to get the settings right.
No, there isn’t normally a door-sill plate on the rear doors. This is a Kenriko “extra”.
What’s Next?
I’ve got at least two more wraps in the works: I want to cover the wood dashboard strip in Matrix Black and portions of the steering wheel in Matte Black, like the center console. I plan to wait for Kenriko to upload templates for these mods, since he does all that work with more care and patience than I’m likely to use. I plan to update this post once I’ve got those done.

Looking forward to seeing your Dash when complete
LikeLike
great, thanks for sharing, what were your settings on the Silohuette for the Matrix Black? Also, looking forward to the dash when you have it done
LikeLike
I used Blade=3, Speed=8, Force=20. The dash was easy. Just bought a piece 5’x2′. I removed the dash first so I didn’t have to do it in place. Was super easy. No need for the vinyl cutter. Just put it in place and trimmed with a razor blade.
LikeLike