Sony RX1R

DSCRX1RB_1

In episode #5 of All About the Gear, Frederick Van Johnson and I discuss the Sony RX1R.


The RX1R is an awesome little camera, which I very quickly learned to love. After the Leica M-series, it’s the second full-frame mirrorless digital camera on the market. Should you rush out and buy one? No, because I think Sony is about to release even better options. Let’s start with the basics.

Continue reading

(Un)Stiffed by Adobe

[Update: This issue has been resolved in my favor. It was a case of one hand not knowing what the other was doing. Although people on the Adobe Forum (including at least one forum staffer) insisted I didn’t qualify for the Photoshop Photography Program, they were in fact wrong. Not only that, but Adobe had already automatically switched my account from single-app Photoshop CC to the PPP bundle that included Lightroom 5. I accept some of the blame for not going to the My Account page on Adobe.com to check. But since I couldn’t find any info about his in the FAQs or other online Help pages, I thought I’d ask in the Forum.

Special thanks to Larry Nienkark who pointed out that he successfully received this upgrade. It caused me to check to see if I’d received it automatically as well…and I had!]

Continue reading

Gigapan Experiments

This afternoon I started work on a future episode of All About the Gear on which I’ll review the Gigapan EPIC Pro. Here’s my second attempt at a Gigapan image of the Golden Gate Bridge. Expand to full screen, zoom into it and pan. Check it out. (Sorry it’s Flash, but that’s how the Gigapan viewer works.)

http://www.gigapan.com/gigapans/0c555d389b119fa2efea2ad3a943119c/options/nosnapshots,hidetitle,fullscreen/iframe/flash.html?height=400

32 images in a 4×8 grid. Shot with a Nikon D800E at ISO 100. 70-200mm f/2.8. 1/400 second, f/8, 200mm. Stitched in the Gigapan Stitch app. The limitation to the resolution here isn’t the 36MP camera, the lens or the application. It’s due to atmospheric aberration. A problem with long-distance shots at 6pm on a warm September day.

Photoshop: Fixing Those Shiny Faces

I was shooting a wedding rehearsal dinner in New York in a restaurant with dark walls and ceiling. No choice: I couldn’t bounce a flash off of anything white, so I had to use on-camera flash. I popped a Gary Fong Lightsphere onto the SB900 atop my Nikon D3s for the job. Although Gary’s “Tupperware” diffuser helps, you still end up with results like this. Obviously lit from just above the lens, and the awful glare from shiny skin.

Andrew & Mikey

But as luck would have it, I just returned from a four-day intensive workshop with color-correction.retouching guru Dan Margulis, where I learned a marvelous technique for improving those blown-out shiny highlights. After some experimentation, I came up with a variation of Dan’s technique. It works so well, I thought I’d share it with you here. The results are shown below.

Andrew & Mikey

The first steps are from Dan:

  • Dan’s technique requires that you switch to the Lab colorspace. Using my variation, you can stay in RGB.
  • Create an empty layer. (Dan uses a duplicate layer. I prefer to work in an empty one.)
  • Using the eyedropper tool, select an area with color near the blown-out highlight. This sets the foreground color.
  • Using the brush tool, paint that color over the shiny area. Dan sets the brush to Color mode. I paint in Normal mode, then change the layer to Color mode.

The results replace the white in the shiny area with color, but keep the luminosity. In Dan’s Lab version, this creates a color that Photoshop can’t render. It’s as bright as pure white but still has color. Since this isn’t possible in RGB or on your screen, Photoshop is forced to convert it to something else, which is why Dan’s technique works. I stay in RGB, then use the following additional steps:

  • Duplicate the layer you just created containing the touch-ups.
  • Switch it to Normal mode.
  • Dial back the Opacity to 30%-40%.

The result is similar to what Dan achieves in Lab, but I think you have a bit more control over it. Dan’s technique preserves virtually all of the contrast and texture. My version allows you to sacrifice some of that texture in order to reduce the highlights further. Give it a try!

Sony RX1R — Visions of Cameras Future?

SonyRX1R

I’ve been shooting with the Sony RX1R for the past week as research for the next episode of All About the Gear. It’s certainly not perfect, but there are aspects of this camera that make it quite extraordinary. And now the word on the street is that the RX1R will be the basis for a full-frame Sony NEX body (ie, interchangeable e-mount) within the next month or two. If so, it will likely be the best (overall) interchangeable-lens full-frame-camera. Sorry Leica users, but it could be true.

Here’s an example. This 24MP image was shot at ISO 8000 (not 800!), f/5.6, 1/320 second. It’s pretty much straight out of the camera. (It has a permanently affixed Zeiss 35mm f/2 lens.) This image is scaled in your browser to 600×400 from a 1920×1280 JPEG, which in turn was made from the original 6000×4000 pixel RAW file. In other words, what you see below is 0.24MP or a 1/10 (linear) scale of the full-size image. There are 100x more pixels in the RAW file than what you see here. Click (maybe twice) to see the 1920×1280 version.

_DSC0180

Now take a look at three full-scale 100% crops from the above image.

_DSC0180.jewels

The image above shows the detail of an area with a lot of specular highlights. Much of it is beyond the depth-of-field limits, so don’t judge it for sharpness.

_DSC0180.heels

This one, above, shows the level of detail in a non-highlight area. Two things of note: First, there aren’t any moire problems due to the lack of an anti-aliasing filter on the RX1R’s sensor. I haven’t been able to create any moire patterns except when I worked very hard to do so.

Second, check out the noise in the shadows. Yes, it’s ISO 8000 so there’s some noise, but notice how natural it appears. It almost looks like film grain, and there’s certainly none of that annoying colorful “confetti” grain.

_DSC0180.shadows


Finally, the image above is from a very dark area of the original. Again, look how unobjectionable the noise is.

I plan to shoot at even higher ISOs, but so far I’d say that this sensor/lens combination looks as good to me as any lens on my Nikon D800E.

Sony NEX-6 Update

NEX6LB_3

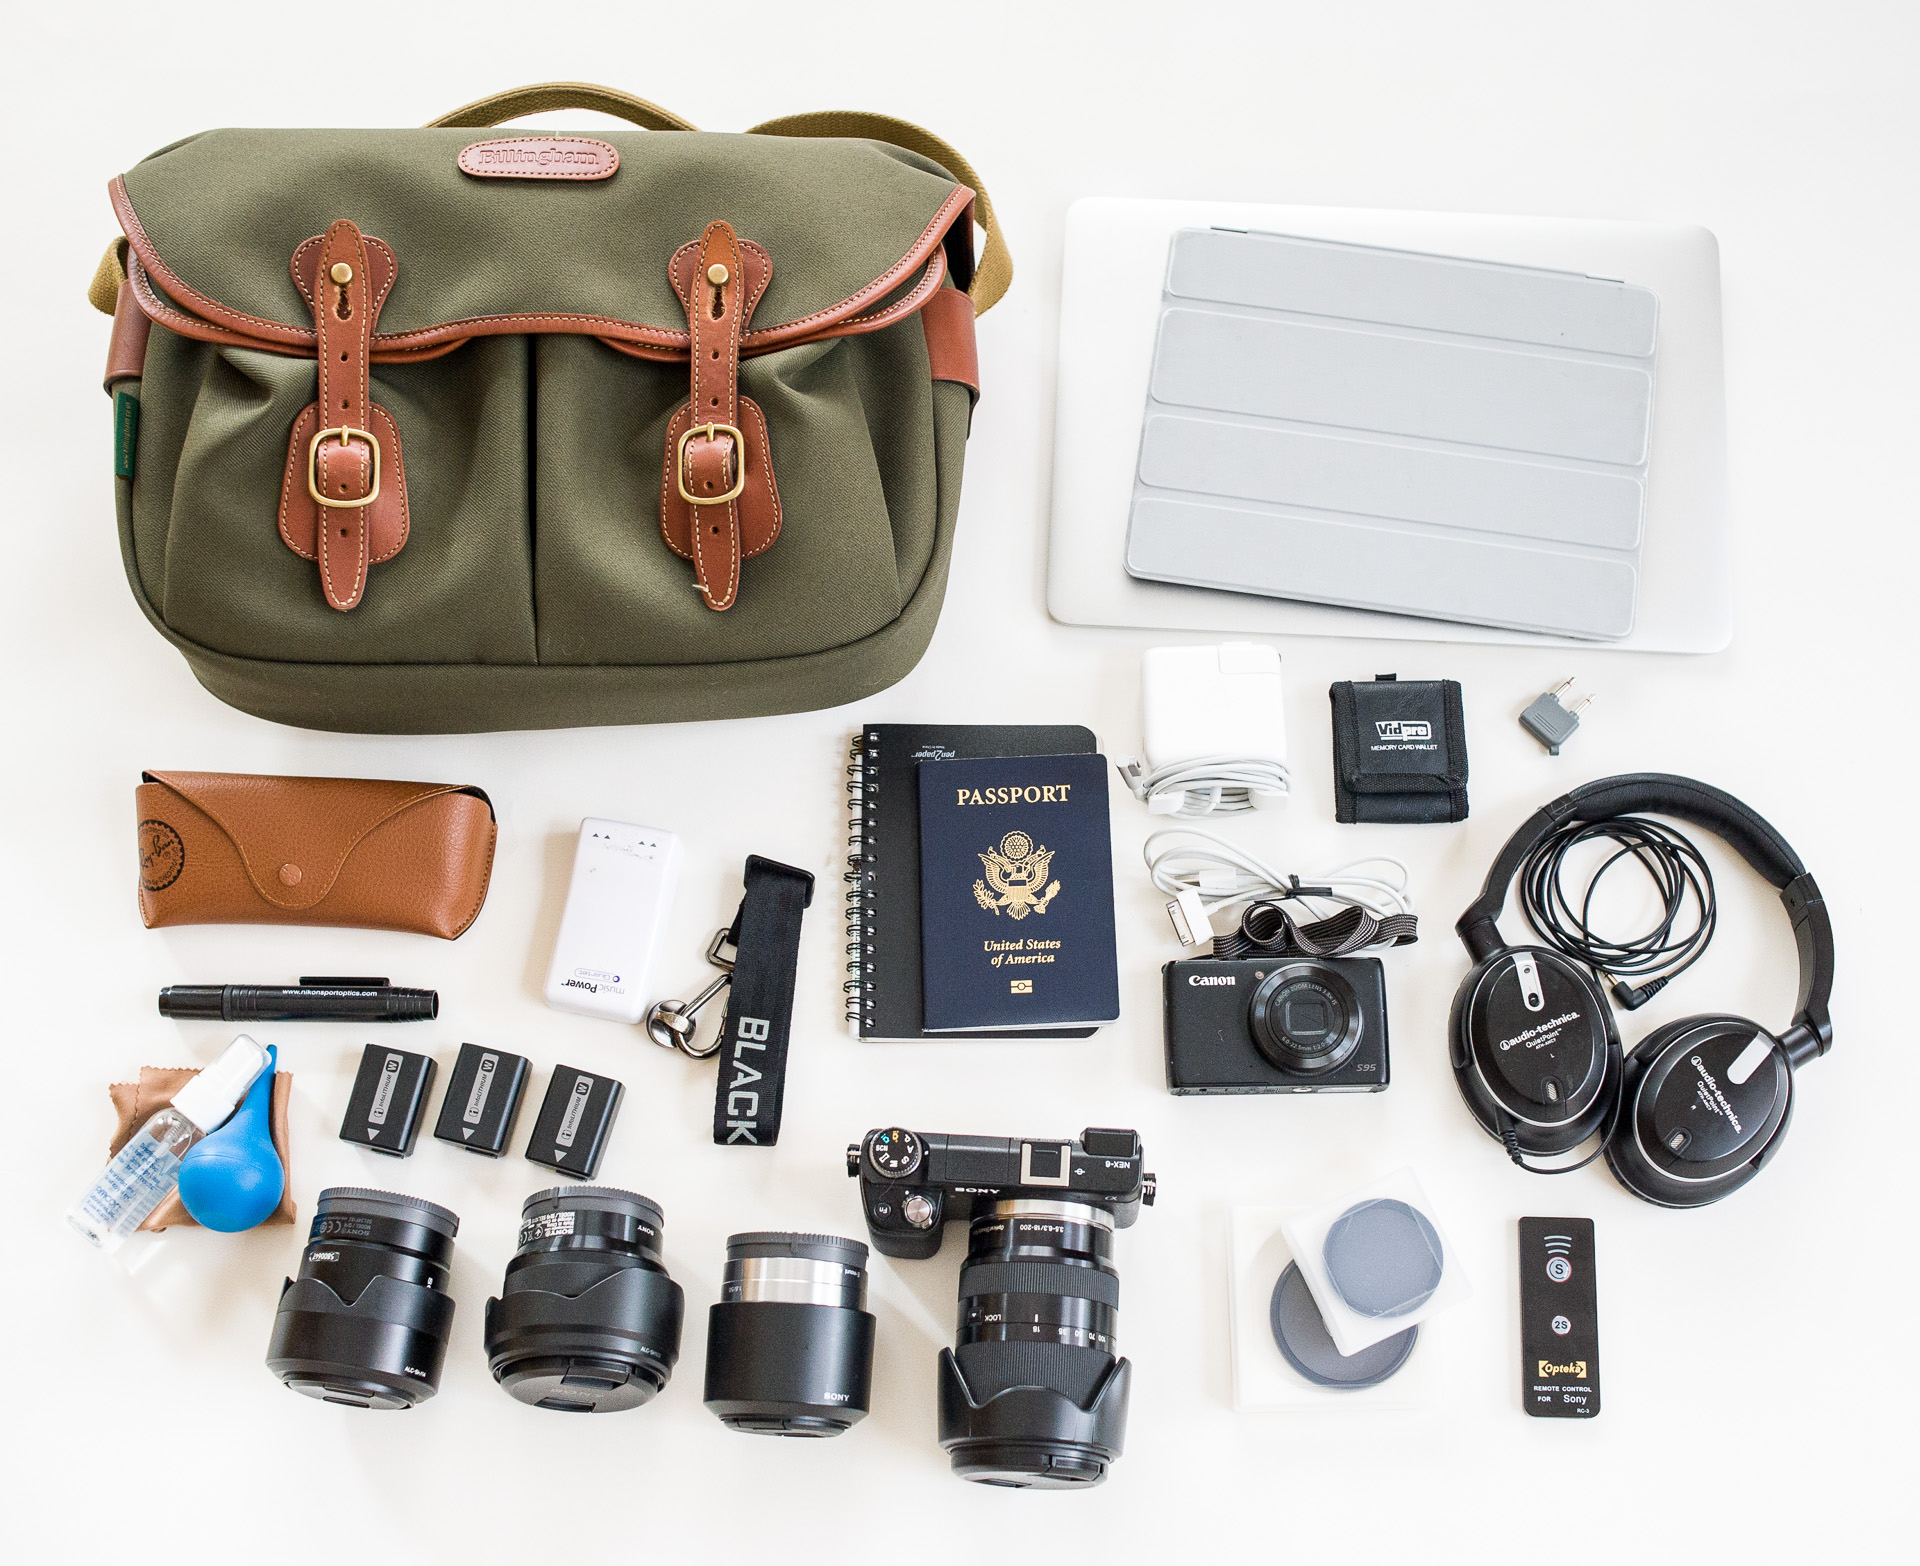
A month ago I blogged about taking the Sony NEX-6 and four lenses on a trip to Turkey. At that time there were two unresolved issues. Here’s how they worked out.

LCD Shutoff: While in Turkey, this problem became progressively worse. I often used the rear LCD tipped up 90 degrees. This allowed me to shoot from very low without having to get down onto my knees. But as the camera warmed up, particularly with the LCD set to ‘Bright’ for exterior use, I found it would shut off whenever I tipped the camera up from horizontal. If I tipped the camera down to or beyond horizontal, it worked fine. I emailed B&H from Turkey who write back, “No problem,” and as soon as I returned home, I sent it to them in exchange for a new one.

Fast forward a few weeks. The replacement NEX-6 arrives and…it has the same problem. Not only that, but so does my NEX-7!! What’s going on? A design defect?

So here’s the embarrassing truth. It was user error all along. There’s a sensor on the rear of the camera that switches between the LCD and the electronic viewfinder (EVF) when you put your eye to the EVF. I was holding the camera up against my own (too large) body, and when I tipped the camera up just slightly, the camera said to itself, “Oh, there’s a very large mass close to the EVF. I’ll switch over to that mode.” Yup, it had nothing to do with brightness, heat, attitude, etc. All I’ve had to do to solve the problem is to hold the camera two inches away from my body, and everything works fine. Oops.

18-200mm Autofocus: Immediately before the trip I bought the SEL18200LE superzoom, one of the four lenses I took on the trip. One reason I took the NEX-6 instead of the -7 is that the NEX-6 has superior phase-detection autofocus. That is, so long as the lenses support it and have been upgraded with the latest firmware.

I was able to update the firmware in my other lenses myself, but for some reason Sony requires that you send your (brand new) 18-200mm zoom back to them for this upgrade, and it takes two weeks. Since I was about to leave on the trip, I decided to wait until I got back and to suffer with the inferior autofocus when using this lens.

Now the superzoom is back, so how much difference is there? Not as much as I’d hoped. The time it takes for the lens to rack from far out-of-focus to in-focus isn’t any less. It’s still slow. At 200mm, for example, it takes a full four seconds to focus from one extreme to the other, essentially the same as before the upgrade.

[Sidebar: I have to admit that I’m horribly spoiled by the ultra-fast autofocus on my big Nikons. Using the D3s, the equivalent 28-300mm zoom at 300mm focuses from one extreme to the other in about one second. The 85mm f/1.8 does this in about 1/2 second, and the killer 70-200mm at 200mm can rack from one extreme to the other in about 1/4 second. But, of course, the battery alone in the D3s weighs almost as much as the body of the NEX-6.]

There is one improvement, however. Because of the addition of the phase-detection autofocus sensor, the lens doesn’t have to “hunt” nearly as much when it focuses. It still takes a long time to go from one extreme to the other, but once it gets to the right focus it stops there fairly quickly. And if it starts fairly close to in-focus, it does a better job than previously. Before the firmware upgrade, it would overshoot, then correct and maybe correct again while it used only contrast to determine what’s in focus. The phase-detection sensors allow the camera to predict the in-focus point and therefore minimize the overshoot. It’s still not as good in this regard as the big Nikons. The NEX-6 still scratches its head a bit, whereas the D3s virtually jumps to the perfect focus.

[Note: In addition to the lens firmware, which must show as version 02, the NEX-6 body itself must be updated to version 1.01 or later. Luckily, you can do this yourself.]

All in all, I’m now happy with the NEX-6. I’ll probably sell the NEX-7 to fund something new. I prefer the controls on the NEX-6 — I’m tired of inadvertently changing things on the -7 — and who really needs 24MP for casual use? 16MP in the NEX-6 plus the better autofocus make it my favorite in this family.

Prime or Zoom?

In a comment to my previous post, Dan Dawson asked, “I’d be curious, of the shots taken with the primes, what apertures were used in the shots you kept… were they wide open at f/1.8 or did they wander up in to the range that your zooms could have handled?” Good question. Here are those data:

Screen Shot 2013-06-29 at 4.56.23 AM


The chart shows the distribution of images I shot with a Zeiss 24mm f/1.8 using a Sony NEX-6 on a recent trip to Turkey. These are the images I actually published — 16 out of 907 taken with that lens. The chart also highlights (via a horizontal red line) images that could have been shot with the 18-200mm f/3.5-6.3 superzoom, which opens to f/4 at 24mm.

Admittedly, the sample is a bit small. I did the same for the 50mm f/1.8 and the numbers were even smaller and therefore less conclusive.

Which Lenses Did I Actually Use?

Two days ago I posted a lengthy article about the photo gear I took to Turkey. But I was still curious which lens(es) I might have been able to do without if I had to do it all over again. To be objective I logged the EXIF data to see the focal lengths of the first 94 images I published from the trip (out of 4,200 taken). They’re a good sample and generally the best of what I shot. Below is a chart showing the results.

Screen Shot 2013-06-28 at 2.41.01 PM

This is a histogram/scatter chart. (Thanks to Ian Leslie for his suggestion of a better way to display these data.) Click to enlarge it. The vertical scale is focal length (logarithmic). The bottom is 10mm and the top is 200mm. There’s no horizontal scale, just 94 horizontal positions, one for each photograph. So just consider the height of the blue diamonds and how they cluster. I added two horizontal red lines to highlight the two prime lenses: 24mm and 50mm. And on the right side there are two vertical lines showing the ranges of the two zooms.

I used four lenses, the ranges of which are shown above in red:

  • 24mm f/1.8
  • 50mm f/1.8
  • 10-18mm f/4
  • 18-200mm f/3.5-6.3

So what conclusions can I draw? As I expected, the 24mm was more valuable than the 50mm. But if I hadn’t had the 10-18mm or the 18-200mm, there are a lot of shots that wouldn’t have been captured, at least not the same way. From this chart, I don’t see anything that would convince me to change the lenses for the next trip, but it was an interesting experiment nonetheless.