In episode #2 of All About the Gear, Frederick Van Johnson and I discuss the Leica Mystique. I spent more than a week shooting with an M9 and an M (typ 240) plus a collection of lenses.
Most of what I learned is in the video, but here are my notes in case they’re helpful.
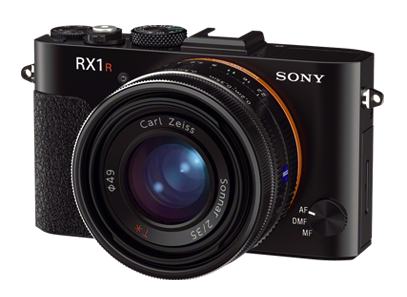
In episode #5 of All About the Gear, Frederick Van Johnson and I discuss the Sony RX1R.
The RX1R is an awesome little camera, which I very quickly learned to love. After the Leica M-series, it’s the second full-frame mirrorless digital camera on the market. Should you rush out and buy one? No, because I think Sony is about to release even better options. Let’s start with the basics.
This afternoon I started work on a future episode of All About the Gear on which I’ll review the Gigapan EPIC Pro. Here’s my second attempt at a Gigapan image of the Golden Gate Bridge. Expand to full screen, zoom into it and pan. Check it out. (Sorry it’s Flash, but that’s how the Gigapan viewer works.)
32 images in a 4×8 grid. Shot with a Nikon D800E at ISO 100. 70-200mm f/2.8. 1/400 second, f/8, 200mm. Stitched in the Gigapan Stitch app. The limitation to the resolution here isn’t the 36MP camera, the lens or the application. It’s due to atmospheric aberration. A problem with long-distance shots at 6pm on a warm September day.
I was shooting a wedding rehearsal dinner in New York in a restaurant with dark walls and ceiling. No choice: I couldn’t bounce a flash off of anything white, so I had to use on-camera flash. I popped a Gary Fong Lightsphere onto the SB900 atop my Nikon D3s for the job. Although Gary’s “Tupperware” diffuser helps, you still end up with results like this. Obviously lit from just above the lens, and the awful glare from shiny skin.
But as luck would have it, I just returned from a four-day intensive workshop with color-correction.retouching guru Dan Margulis, where I learned a marvelous technique for improving those blown-out shiny highlights. After some experimentation, I came up with a variation of Dan’s technique. It works so well, I thought I’d share it with you here. The results are shown below.
The first steps are from Dan:
Dan’s technique requires that you switch to the Lab colorspace. Using my variation, you can stay in RGB.
Create an empty layer. (Dan uses a duplicate layer. I prefer to work in an empty one.)
Using the eyedropper tool, select an area with color near the blown-out highlight. This sets the foreground color.
Using the brush tool, paint that color over the shiny area. Dan sets the brush to Color mode. I paint in Normal mode, then change the layer to Color mode.
The results replace the white in the shiny area with color, but keep the luminosity. In Dan’s Lab version, this creates a color that Photoshop can’t render. It’s as bright as pure white but still has color. Since this isn’t possible in RGB or on your screen, Photoshop is forced to convert it to something else, which is why Dan’s technique works. I stay in RGB, then use the following additional steps:
Duplicate the layer you just created containing the touch-ups.
Switch it to Normal mode.
Dial back the Opacity to 30%-40%.
The result is similar to what Dan achieves in Lab, but I think you have a bit more control over it. Dan’s technique preserves virtually all of the contrast and texture. My version allows you to sacrifice some of that texture in order to reduce the highlights further. Give it a try!
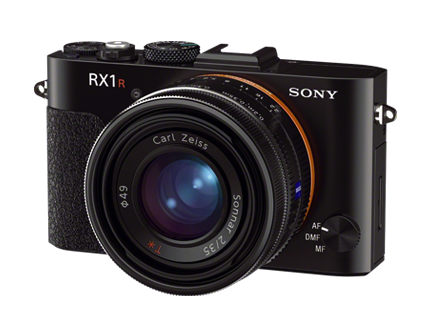
I’ve been shooting with the Sony RX1R for the past week as research for the next episode of All About the Gear. It’s certainly not perfect, but there are aspects of this camera that make it quite extraordinary. And now the word on the street is that the RX1R will be the basis for a full-frame Sony NEX body (ie, interchangeable e-mount) within the next month or two. If so, it will likely be the best (overall) interchangeable-lens full-frame-camera. Sorry Leica users, but it could be true.
Here’s an example. This 24MP image was shot at ISO 8000 (not 800!), f/5.6, 1/320 second. It’s pretty much straight out of the camera. (It has a permanently affixed Zeiss 35mm f/2 lens.) This image is scaled in your browser to 600×400 from a 1920×1280 JPEG, which in turn was made from the original 6000×4000 pixel RAW file. In other words, what you see below is 0.24MP or a 1/10 (linear) scale of the full-size image. There are 100x more pixels in the RAW file than what you see here. Click (maybe twice) to see the 1920×1280 version.
Now take a look at three full-scale 100% crops from the above image.
The image above shows the detail of an area with a lot of specular highlights. Much of it is beyond the depth-of-field limits, so don’t judge it for sharpness.
This one, above, shows the level of detail in a non-highlight area. Two things of note: First, there aren’t any moire problems due to the lack of an anti-aliasing filter on the RX1R’s sensor. I haven’t been able to create any moire patterns except when I worked very hard to do so.
Second, check out the noise in the shadows. Yes, it’s ISO 8000 so there’s some noise, but notice how natural it appears. It almost looks like film grain, and there’s certainly none of that annoying colorful “confetti” grain.
Finally, the image above is from a very dark area of the original. Again, look how unobjectionable the noise is.
I plan to shoot at even higher ISOs, but so far I’d say that this sensor/lens combination looks as good to me as any lens on my Nikon D800E.
Earlier today, Frederick Van Johnson and I recorded a pilot for a new series from This Week in Photo. The series is tentatively called All About the Gear and the pilot episode is The Olympus OM-D vs Sony NEX 7 – Is Mirrorless More, or Less?
In the show I made the statement (at about the 8:00 mark) to the effect that the depth-of-field on a micro four-thirds (MFT) camera at a given aperture (say f/4) would be the equivalent of f/8 on a crop-sensor camera like the Sony NEX-7. What I should have said was that it would have been the equivalent of f/8 on a full-frame (FF) body. That’s what happens when you try to talk faster than your brain can operate.
In any case, in the YouTube comments, Jamie MacDonald challenged that statement, saying “f/1.8 is f/1.8 It is ‘sensor agnostic’ if you will.” Jamie is technically correct and I was taking a shortcut for the benefit of simplicity, for which I apologize. However this continues to be a much misunderstood issue, which I think deserves a more complete explanation.
Imagine you’re taking a picture of a tree with two cameras, both equipped with zoom lenses, from the same location. One is an MFT and the other is FF. Let’s assume both are set to an aperture of f/4. You compose your shot on the MFT camera and it turns out to require a focal length of 45mm. Now you compose the exact same shot on the FF camera. The tree is the same size (in terms of percentage of frame height) in both viewfinders. If you check the focal length on the FF camera, you’ll see it’s set to about 90mm. Same shot. Same aperture. Different focal lengths.
Now go home and look at both images. You’ll see that the image from the MFT camera has a much greater depth-of-field, while the one from the FF has much more boken, or blurring as you get away from the in-focus area of the image. Why, because of the difference in real focal length as opposed to equivalent focal length. (We say that 45mm on the MFT camera is the full-frame equivalent of 90mm because of the size of object in the frame from the same distance.)
As Jamie correctly points out, this is not actually due to the aperture, since it’s the same in both cases. But here’s the thing: If instead of shooting the FF image at f/4, you use f/8, now you would find the depth-of-field in the resulting images was nearly identical.
The superzoom on my big Nikons is 28-300mm. An equivalent superzoom on an MFT camera is 14-150mm. Those lens/camera combinations give me the same image-area range. I most-often shoot in aperture-priority mode, so with my FF camera I might decide to use f/11 to give me the desired depth-of-field for a particular shot. In order to get the same depth-of-field using the MFT camera, I need to set it to f/5.6.
So what does this mean in practice? When using lenses of equivalent focal lengths such as the kit zooms on each, to get the same depth-of-field as a full-frame camera, you need to use an aperture about two stops wider on an MFT camera and about one stop wider on an APS-C crop-sensor camera.
Hope that helps.
And please: give us feedback on the new show. Here, on the TWiP blog or on the YouTube channel.