Free Photoshop Actions: 1/4- and 3/4-Tone Masks

Inspired by the great work of Tony Kuyper and Mark Lindsay plus the video tutorials by Sean Bagshaw, I’ve just posted this 14-minute tutorial on how to use my new free Photoshop actions to enhance the 1/4- and 3/4-tone portions of your images.

Download the free Photoshop Actions. (My Photoshop Actions for 1/4- and 3/4-tone masks are not compatible with current versions of Photoshop. Beside, the latest version of Tony Kuyper’s TKActions Panel includes a superior tool for generating these masks.)

How Does Sensor Size Affect Depth-of-Field?

Earlier today, Frederick Van Johnson and I recorded a pilot for a new series from This Week in Photo. The series is tentatively called All About the Gear and the pilot episode is The Olympus OM-D vs Sony NEX 7 – Is Mirrorless More, or Less?

https://www.youtube.com/watch?feature=player_embedded&v=gUYVVdefrbI

In the show I made the statement (at about the 8:00 mark) to the effect that the depth-of-field on a micro four-thirds (MFT) camera at a given aperture (say f/4) would be the equivalent of f/8 on a crop-sensor camera like the Sony NEX-7. What I should have said was that it would have been the equivalent of f/8 on a full-frame (FF) body. That’s what happens when you try to talk faster than your brain can operate.

In any case, in the YouTube comments, Jamie MacDonald challenged that statement, saying “f/1.8 is f/1.8 It is ‘sensor agnostic’ if you will.” Jamie is technically correct and I was taking a shortcut for the benefit of simplicity, for which I apologize. However this continues to be a much misunderstood issue, which I think deserves a more complete explanation.

Imagine you’re taking a picture of a tree with two cameras, both equipped with zoom lenses, from the same location. One is an MFT and the other is FF. Let’s assume both are set to an aperture of f/4. You compose your shot on the MFT camera and it turns out to  require a focal length of 45mm. Now you compose the exact same shot on the FF camera. The tree is the same size (in terms of percentage of frame height) in both viewfinders. If you check the focal length on the FF camera, you’ll see it’s set to about 90mm. Same shot. Same aperture. Different focal lengths.

Now go home and look at both images. You’ll see that the image from the MFT camera has a much greater depth-of-field, while the one from the FF has much more boken, or blurring as you get away from the in-focus area of the image. Why, because of the difference in real focal length as opposed to equivalent focal length. (We say that 45mm on the MFT camera is the full-frame equivalent of 90mm because of the size of object in the frame from the same distance.)

As Jamie correctly points out, this is not actually due to the aperture, since it’s the same in both cases. But here’s the thing: If instead of shooting the FF image at f/4, you use f/8, now you would find the depth-of-field in the resulting images was nearly identical.

The superzoom on my big Nikons is 28-300mm. An equivalent superzoom on an MFT camera is 14-150mm. Those lens/camera combinations give me the same image-area range. I most-often shoot in aperture-priority mode, so with my FF camera I might decide to use f/11 to give me the desired depth-of-field for a particular shot. In order to get the same depth-of-field using the MFT camera, I need to set it to f/5.6.

So what does this mean in practice? When using lenses of equivalent focal lengths such as the kit zooms on each, to get the same depth-of-field as a full-frame camera, you need to use an aperture about two stops wider on an MFT camera and about one stop wider on an APS-C crop-sensor camera.

Hope that helps.

And please: give us feedback on the new show. Here, on the TWiP blog or on the YouTube channel.

Sony NEX: The Lenses

In the first part of my review I compared the bodies of the Sony NEX-6 and NEX-7. As I mentioned then, my motivation for these reviews is to find the best way to “travel light” for a non-photographer’s trip to Turkey in June. I already own an NEX-7 with two lenses, but I wanted to (a) check out the NEX-6, and (b) find the best suite of lenses for this non-assignment. This post is all about the lenses.

Here are the six lenses I’ve used for the past four days and my comments on each:

  • 18-55mm f/3.5-5.6. It’s a good-enough general-purpose lens, which I purchased as the kit lens for my NEX-7. Not particularly sharp and certainly slow, but it’s helped me get some decent shots over the past year.
  • 16-50mm f/3.5-5.6. This is the newer kit lens for the less-expensive NEX bodies, and it’s weird. I wasn’t impressed. It’s a pancake-style zoom and takes about two seconds to expand after the camera is switched on. Seems like forever. It also has a fly-by-wire “power” zoom control, which is great for smooth zooms in video but it has an annoying lag for still images. If you’re buying an NEX camera, I suggest you not buy this lens with it unless you try it out first.
  • 50mm f/1.8. I’ve owned this lens for the better part of a year. Even though it overlaps the 18-55mm in focal length, it’s sharper and faster than the kit lens. I pop it on when I need to grab more light (3 stops faster than the zoom), want the shallower depth of field or have time to take a more-careful shot that would benefit from a sharper lens.
  • 16mm f/2.8. An inexpensive prime, but disappointing, particularly when compared to the alternatives. The interesting thing about this lens is that you can buy two adaptors for it. One converts it into an even wider-angle lens (about a 12mm) and the other gives you a fisheye. I didn’t test with either of these adaptors, but I may do so in the next month or so.
  • 24mm f/2.8 (Zeiss). By all others’ accounts this is the killer lens for the NEX E-mount cameras. Now that I’ve tried it, I agree. Expensive ($1,100) but gorgeous. Sharp, high-contrast, minimal chromatic aberration. At a 36mm full-frame equivalency, this is a terrific lens for both general and high-res use.
  • 10-18mm f/4. This one is my new discovery. I’ve started shooting more with wide and ultra-wide lenses and this really fits that niche. At a full-frame equivalence of 15mm-27mm, it’s reminiscent of my Nikon 14-24mm f.2.8. Well, not nearly as spectacular, but the 10-18mm does a pretty good job considering its size. Still, it’s a bit larger and more expensive ($850) than most other lenses listed here. But I do like it.

Two lenses (the 16-50mm and the 16mm) didn’t make the cut. Here’s the plan for what I’ll be taking to Turkey, at least as of now:

  • 18-55mm f/3.5-5.6
  • 10-18mm f/4 (rented)
  • 24mm f/1.8 Zeiss (rented)
  • 50mm f/1.8

Here’s my logic. The 18-55mm is fine as a walkaround casual lens when I’m outdoors in the daytime and not in my serious-photographer role.  The wide-angle 10-18mm zoom is a perfect compliment to the kit lens with the crossover between them at 18mm (27mm full-frame equivalent). But when I move indoors, need more light and don’t want to crank up the ISO, or when I simply want to spend more time on a subject, I find I switch to the 50mm or the Zeiss 24mm primes.

The only lens I’m missing in this set is something telephoto. The 18-200mm superzooms (11x) are just too large to meet my “travel light” criterion. But with a 24MP sensor on the NEX-7 I always have the option of cropping. If I shoot at 55mm and crop 2:1, it’s the same as though I had used a 110mm lens, which is the equivalent of 165mm on a full-frame camera. And I still end up with a 6MP image, which is fine for posting online and prints up to 8×10.

If you’re thinking of buying one of these bodies or lenses (or any others for that matter) I strongly recommend renting first. Personally, I use BorrowLenses.com, but LensRentals.com and even your local camera shop are good, too. For example, the two lenses I’m taking to Turkey that I don’t already own would cost me about $2,000 total to purchase. To rent the pair for four weeks will cost me only about $225.

There are always surprises with gear. There’s always something the reviews didn’t tell you or you just missed. Rent for a 3-day weekend and it won’t cost you much. I think you’ll be glad you did.

Sony NEX-6 or NEX-7?

[Spoiler alert: If I had to buy today, I’d go for the NEX-6 over the NEX-7. (Yeah, I know: I’m in the minority on this one.) But if you can wait two months, the rumors are that there will be an update to the NEX-7 that will hopefully tip the scales in that direction.]

I’ve been shooting with a Sony NEX-7 on and off for nearly a year, alongside my big Nikons. (See my earlier NEX-7 review.) Although I think of the Nikons as my serious cameras, the fact is that when I looked back at the end of 2012, many of my best images were captured with the NEX-7.

When I leave home for a shoot (even a photowalk) I tend to take at least one body and far more lenses than any reasonable person would be willing to lug around. For a recent trip to Death Valley, I even brought along two tripods. (How dumb is that?) But my wife and I are taking a non-photographer’s trip to Turkey in June, and I’ve decided I want to try traveling really light. As frightening as that sounds — and it does, to me! — it means leaving the Nikon bodies and glass at home. I’m already losing sleep over this. It’s not about the gear. It’s not about the gear…

Since buying the NEX-7, I’ve often wondered if I might have been better off with a micro four-thirds camera. So many friends love them. So I got my hands on an Olympus OM-D E-M5 for a review. Bottom line: Although I made the mistake of testing the OM-D with inferior lenses, I certainly didn’t like the camera any more than I like the NEX-7. The one advantage of the OM-D was the array of superior lenses (which I didn’t test!) for the micro four-thirds system. Sony has been properly criticized for a lack of good ones.

But in the past year Sony has released new lenses. I’d also read positive reviews of the newer NEX-6 and was curious how it stacked up to the -7. And that’s the genesis of this review. I wanted to check out the -6 and some better lenses, ultimately to decide what to take to Turkey. I’ll cover the bodies in this review and save the lenses for a separate post.

Take a look at the DxOMark comparison of the two cameras’ sensors. They’re about as close as they could be, and that confirms my subjective experience. Although the NEX-7 is 24MP and the NEX-6 is only (!) 18MP, they’re both excellent. If anything, 24MP is a bit much for casual photography, particularly if, like me, you always shoot in RAW mode. (I know that five years from now that will sound ridiculous.) If image quality isn’t enough to differentiate these two bodies, what is?

The advantages of the NEX-6 are:

  • A dedicated Mode dial. This is personal preference, and I like this traditional approach. I do tend to change modes fairly often, so this works for me. Because the menu system on both these cameras is simply awful, the big issue is whether I can avoid the menus as much as possible. The NEX-6 allows me to change the important stuff without taking my eye away from the viewfinder: mode, aperture and/or shutter speed, ISO and exposure compensation. The NEX-7 just gives me two different ways to change exposure compensation by adding an extra control.
  • Quick Navi menu. Available by pressing the Fn button, this bypasses that awful menu system to get you to the most-frequently needed functions. Plus, you can change (up to a point) which functions appear here.
  • Less vulnerable controls. For some reason, I move the NEX-7’s controls accidentally more than I do on the NEX-6. I can’t explain why.
  • Superior autofocus. The NEX-6 (and hopefully the replacement for the NEX-7) adds a 99-point phase-detect autofocus array and it really works. This gives the camera faster and more accurate autofocus. If you’re a video shooter — I’m not — this will be important to you since the phase-detect autofocus is even working in video mode, unlike a DSLR. Note that phase-detection autofocus only works on lenses that can support it and in some cases you need to update the firmware in both the body and the lens. In my tests, it worked on the 10-18mm, 18-55mm, 16-50mm, 50mm and 24mm, but not with the 16mm f/1.8.
  • Standard hot-flash shoe. The NEX-7 has one that’s proprietary to Sony. (When will they ever learn?)
  • WiFi. You can use WiFi to copy images to a computer or mobile device or to upload them to Facebook, but it’s a pain to do so.
  • Downloadable apps. Available from Sony’s online store, the apps are free or cost $4.99. It looks like a few of them could be useful, but I didn’t test them.
  • Lighter by 20%.
  • Cheaper by $250 at today’s street prices.

So what’s so good about the NEX-7?

  • Larger, better sensor (but not by much).
  • Tri-Nav controls. Two soft/configurable controls on top versus only one on the -6. As I wrote above, pure personal preference.
  • Battery Life. Probably because of the NEX-6’s WiFi and perhaps the phase-detect autofocus, the NEX-7 battery life is a bit better, rated at 430 shots versus 360 shots for the -6.
  • External mic jack for video shooters.
  • 3D photos for display on your 3D TV. We all have 3D TVs, right?
  • Very slightly smaller, even though it’s somewhat heavier.

As I think you can see, my feelings are that the NEX-6 is, overall, a better camera with the most important differences being the controls and the improved autofocus. I’m not switching from the NEX-7 now, but if Sony combines the best of both in an updated -7, I’ll probably bite.

Here’s Part 2: Sony NEX: The Lenses

Luminosity — Photoshop Techniques (Part 1 of 2)

Why Luminosity? Without variations in brightness (tonality) a black-and-white image would be nothing more than a solid gray rectangle. But the same concept applies to color images as well. Without luminosity you wouldn’t be able to see the folds in a piece of fabric or the shape of a mountain. There would be no way to distinguish the light and dark areas of the same color. Luminosity, more so than color, is the key to defining shapes and showing detail in an image, b&w or color.

I’ve been on a three-year quest to understand how best to manage luminosity, particularly in Photoshop. My goal in Part 1 of this article is to explain what I’ve learned along the way towards my current luminosity workflow. Yes, I could simply jump to my current techniques, which I will instead cover in Part 2, but I think the evolution and order of presentation is important to developing a clear understanding of how the more advanced techniques work and how and when they should be used. Sorry to be such a tease, but I think you’ll thank me in the end.

I’ve pulled together these tools and techniques for managing and improving luminosity from a variety of sources. Almost none of them are of my own invention, and even those I thought were so clever turned out to be invented by someone else long before.

Although I’ve included a few examples and even some step-by-step moves, rather than describe every tool and technique in detail, I’ve opted wherever possible to link to a webpage or video that explains the technique better than I can do within the scope of this article.

Note: This article is based on my presentation to the Marin Photo Club’s Advanced Photoshop SIG in March 2013. Special thanks to Scott Loftesness for discovering and researching many of the techniques and resources described here and for providing feedback at various stages.

The Big Picture: Where Does Luminosity Adjustment Fit in the Workflow? After correcting camera/lens issues (chromatic aberration, distortion, white balance) and recovering highlights and shadows in Adobe Camera RAW (ACR), Lightroom, etc., the next step is to work on an image’s luminosity. This is true regardless of whether it’s a color or monochrome image.  In other words, luminosity adjustment comes right after initial RAW processing of an image either in Lightroom or ACR.

Hierarchy. Instead of grouping techniques according to the problems they solve (e.g., putting all the highlight-recovery techniques together), I’ve organized them according to the complexity of the concepts that underlie the techniques. The sequence is also more-or-less the order in which I learned the techniques as I’ve delved deeper and deeper into Photoshop and learned from the gurus of luminosity.

Below is an outline of those increasingly sophisticated concepts. These are not steps in a workflow. They’re just categories of different ways to understand and solve the same problems of adjusting the luminosity of an image. Over time, as your Photoshop skills improve and you learn more about these techniques, you’ll find you’re drawn to using those in the categories farther down the list.

Starting with the most basic, here are the techniques for dealing with image luminosity:

  • Global Adjustments. Alter the entire image using direct image adjustment or adjustment layer (e.g., Brightness/Contrast, Curves)
  • Local Adjustments. Use an adjustment brush (e.g., the Dodge and Burn tools) or a similar tool to affect only part of the image.
  • Global Adjustments with Masks. Use a global adjustment to alter the entire image, but control which portions are affected using a layer mask. The mask might be:
    • a manually created selection (affects specific areas)
    • a channel used as a mask (affects areas according to color and luminosity)
    • a luminosity mask (affects areas according to luminosity regardless of color)
  • Luminosity Replacement. Generate a new luminosity (layer or channel) using techniques such as:
    • use one channel (e.g., red, green or blue) to redefine the luminosity of all colors;
    • use one or more channels to redefine the luminosity of the image, selecting the areas, ranges or luminosity values affected using masks; or
    • creating a separate monochrome version of the image and using that to redefine the luminosity of the color image.
  • Luminosity Painting. Use any of the above techniques to create an enhanced luminosity layer, but apply that layer by brushing with an active selection (based on yet another channel/mask) to control where the effect is applied. I’ll explain luminosity masks and luminosity painting in Part 2 of this article.

Seeing the Luminosity. To view the luminosity of an image — we’ll assume for the rest of this discussion that we’re working with a color image — here are three techniques:

  • Desaturate the image. Image->Adjustment->Desaturate (⌘-shift-U on Mac).
  • In the Channels palette, look at each of the RGB channels separately (⌘-3,4,5 on Mac).
  • To see all ten usable channels (RGB, CMYK, Lab) get the Channels Power Tool (€20, highly recommended). The CPT plugin also simplifies applying channels to layers and masks, which we’ll use in later techniques.

The images below illustrate the before/after effect of the Desaturate command. Notice how similar the previously blue and yellow areas appear because they have very similar luminosity values. Also note that the number “1” on the hull is nearly invisible because it has almost the same luminosity value as the area immediately around it.

The four images below illustrate the contents of the individual color channels. Note, for example, how much difference there is between the blue and yellow areas in the B channel. Yellow is the complement of blue and hence appears very dark in the B channel. Also note how the number “1” on the boat’s hull appears much more clearly in the R channel than in the other color channels or the full RGB image. We’ll look at ways to use the R channel to enhance that detail in the color/RGB image later in this article. (Mark Lindsay’s Channeling Channels is a good introduction to the concepts of channels.)

Global Luminosity Adjustment Tools. Photoshop includes a number of tools in the Image->Adjustments menu for making adjustments to luminosity of the entire image. You may have thought they were too simplistic to bother with, but you should become familiar with each of them. There are many situations in which they’re more valuable than you might expect, particularly when manipulating masks. The same or similar tools are also available as Adjustment Layers, which is the preferred way to use them in most cases since Adjustment Layers are non-destructive. I generally only se the menu-based adjustments to increase the contrast of a layer mask — something I can easily restore if I’m not happy with the results.

  • Brightness/Contrast
  • Curves
  • Levels
  • Exposure
  • Shadows/Highlights
  • Threshold (sometimes useful in mask manipulation)

Below is a before/after example of a global luminosity adjustment (a Levels adjustment in this case).

Local Luminosity Adjustment Tools (Dodge & Burn). Dodging and burning are techniques every photographer should learn. As opposed to global changes in contrast and exposure, these local adjustments are where you really learn to producer richer images with more depth and detail. They’re also the basis for the most advanced technique we’ll cover in Part 2, luminosity painting.

There are a variety of ways to selectively dodge (lighten) and burn (darken) specific areas of an image. The simplest are the Dodge and Burn tools that have been a part of Photoshop for many years.

The Dodge and Burn tools are destructive, so before using them make a copy of the layer you want to adjust. The only way to reliably reverse the effect of these tools in their normal use mode is to use the Undo command. An advantage of these tools, however, is that you can elect to alter only the highlights, midtones or shadows of an image using a pull-down in the tool’s property area.

For example, if you dodge an area of high contrast that has both light and dark areas, the light areas will be lightened while the dark areas will be far less affected. Hence the contrast will be increased.

As we look at increasingly more powerful techniques, we’ll see better and better ways of dodging and burning your images.

Consider Working in Lab Color Mode. When working in the RGB colorspace, particularly when making substantial adjustments, increasing contrast using the above tools has the unwanted side effect of also increasing color saturation.

There are two solutions to this problem. The first (and my preference) is to use these tools in Lab color mode in which you can adjust the L channel (Luminance) independent of the a & b (color) channels.

Rather than convert your entire image to Lab (and possibly mess up some of the adjustments you’ve already made), use Image->Duplicate… and select Duplicate Merged Layers Only. Then convert the copy to Lab mode (Image->Mode), make your adjustments, merge the layers, and finally copy the Lab image onto the RGB version. The Lab image will appear as a new layer, which you can then temper with the Opacity adjustment.


Sidebar: Copying Images as Layers. A few students have told me they didn’t know how to copy one image onto another as a new layer. I couldn’t locate a short video on this topic, so here are the steps in longhand.

  • To start, your images must be exactly the same size (in pixels).
  • Enable the Move tool (keyboard shortcut: v).
  • Hold down the shift key, which tells Photoshop you want the source image to be aligned with the target image.
  • If you’re in tab-view mode, drag the source image to the destination image’s tab, but don’t release either the mouse button or the shift key. Wait for a moment for the destination image to appear, then continue dragging into the destination image itself. Release the mouse button and the shift key. 
  • If you’re in a tiled-view mode, drag and drop the source image to the destination image, then release the shift key.

For example, the left image below is the original. The center and right images show the results of Levels adjustments of gamma=0.35. The center one was done in RGB mode and illustrates the increased saturation. The right image was done in Lab mode and demonstrates that only the contrast has changed.

The Lab color mode is an extraordinarily powerful tool but beyond the scope of this discussion on luminosity. For more information on using Lab color, start with my post on Lab Color and My Workflow du Jour.

Get to Know Blend Modes and Blend-If. From here on, you should be comfortable with both blend modes and the blend-if options in Photoshop’s Layer Style dialog box. I’ve previously written an article on Blend Modes in Photoshop that should get you started.

Dodging and Burning with Blend Modes. Once you understand blend modes there are better ways to do almost anything when it comes to luminosity in Photoshop. Blend modes give us two better ways to do dodging and burning.

The first variation is to make your adjustments on a new layer in Overlay (strong) or Soft Light (weaker) blend mode filled with 50% gray. The advantage is that you can undo your dodging and burning either by using the Eraser tool or by painting with a 50% gray brush. The disadvantage is that you’ll no longer have the option of selectively altering the highlights, midtones or shadows.

The second technique is to paint with a black or white brush on a 50% gray layer set to Overlay or Soft Light blend mode. This has the same strengths and weaknesses as using the Dodge and Burn tools. I recommend two videos on this technique, both of which will also lead you to a slew of other great videos: Aaron Nace’s Dodge & Burn, and Sean Bagshow’s Dodge & Burn. If you’re new to or uncertain about blend modes, these videos will help.

Highlight/Shadow Recovery (Blend Modes). Another simple technique using blend modes is to enhance the brightest and darkest areas of your image.

You can’t truly recover blown-out highlights (or plugged-up shadows) with Photoshop, but you can to some extent darken (lighten) and increase the contrast in those areas to show more detail. (If your original image is in RAW format, you can recover at least some of the highlight and shadow information, but you need to do that in your RAW processing software — Lightroom, ACR, etc. — before bringing your image into Photoshop.)

To darken highlights, duplicate the background layer, then change the blend mode of the top layer to Multiply. This will darken everything, so go into Layer Styles and use the This Layer blend-if sliders (aggressively!) to restrict the darkening to only the highlight areas.

To lighten the shadows, do the same as above, but use Screen mode instead of Multiply and use blend-if to keep the effect out of midtones and highlights.

The four images below illustrate how these techniques can be used separately and together.

Masks and Selections. The above examples of highlight and shadow recovery were created using only blend modes and the blend-if feature. But to combine the recovered images into the final “Both” version I had to use a layer mask filled with a gradient. That’s because I couldn’t create a smooth transition of the midtones in the image (the background mountains and some of the red soil in the foreground) using blend-if.

You’ll frequently find that using continuous-tone masks such as gradients and masks created from the color channels (e.g., the red, green and blue channels) are very helpful in isolating the effect of your adjustments to specific areas or tones within an image. We’ll see much more about this in Part 2.

Because so much detail is contained in the luminosity of an image, you’ll likely find the traditional means of creating a selection or mask (e.g., the lasso tools, the quick selection tool and the magic wand) are far less helpful than you might expect. These tools create all-or-nothing rather than continuous-tone selections, and even if you try to adjust or soften their edges (e.g., using Refine Edge), you often don’t get what you want.

In Part 2 we’ll explore many opportunities to use color channels as masks. Not only are channels continuous-tone, they’re also self-feathering, guaranteeing smooth transitions between selected and non-selected portions of your image.

Furthermore, hard-edge selections create masks that contain no detail except at their edges, whereas masks made from channels retain all the detail from that channel.

Get to Know Channels and Apply Image. The techniques described in the remainder of this article require that you copy images or channels to layers or masks. There are a number of keyboard shortcuts, but they’re hard to remember and not very flexible. The fundamental tool for copying images or channels to other places is the Image->Apply Image… dialog box.

I suggest you read Harold Davis’ Using Image Apply Image on photo.net. Don’t be scared off by the length of the article. Alternatively you can search the Internet for Photoshop Apply Image Video to find many video tutorials on the topic.

Luminosity Enhancement Using Channels. The objective of luminosity enhancement is to bring out detail in desired areas of an image. Bringing out detail generally means increasing contrast within those areas, for it’s contrast that allows us to see detail.

Unless an image is strictly black-and-white, there is always more contrast in one of the color channels (R, G or B) than in the image overall. The most basic of the luminosity enhancements techniques is to replace the overall luminosity of the image with the luminosity of the color channel that has the most desirable contrast and therefore detail (using the Image->Apply Image… dialog as shown above).

The following channel-replacement technique is recommended by many of my personal Photoshop gurus: Mark Lindsay, Lee Varis and Dan Margulis. A good way to learn more is to start with Lee Varis’ free 10-Channel Workflow videos (Part 1Part 2Part 3Part 4). Part 2 deals specifically with the steps to perform this enhancement:

  • Open the Channels palette and select the best channel. That’s best in terms of contrast in the area you want to enhance. If you have the previously mentioned CPT plug-in, you can use it to generate a preview of not just the RGB channels, but also the CMYK and Lab channels.
  • Add a new empty layer and change its blend mode to Luminosity.
  • Use Image->Apply Image…  (or the CPT plug-in) to load the new layer with the selected color channel.
  • For even more detail, use a Curves or Brightness/Contrast adjustment to increase the contrast in the desired area.
  • Optionally, if you want to restrict the enhancement by color and/or luminosity, use the blend-if sliders in the new layer’s Layer Styles dialog box.
  • As a last resort, if you want to restrict the enhancement to a specific area, you can generate a layer mask. Using the bend-if method is preferred because it can be feathered, whereas creating a mask using selections often causes undesirable hard edges.
  • Note that if you’re working in the Lab colorspace, you can simply replace the L (luminance) channel rather than generate a separate layer in Luminosity mode.

The before/after images below illustrate the effect of using the red channel as the source for the luminosity layer in Lab color mode. Note that the “1” on the hull is much more clearly defined. The blend-if sliders were used to reduce the contrast increase in the blues, and this could be carried further using more of the techniques described in Lee Varis’ videos.

Doug’s Luminosity Shortcut. Although I cut my luminosity teeth on the channel-replacement techniques recommended by Varis, Lindsay, Margulis and others, I’ve pretty much switched to a simpler, quicker and in some ways more-powerful technique. I arrived at this technique by asking myself, “If the best luminosity for a color image is a good black-and-white image, why not just use the best tool for making b&w images?”

My personal favorite b&w tool is Nik’s Silver Efex Pro 2, and I’ve described the method of using that plugin for managing the luminosity of color images in Silver Efex Pro for Color Images.

Luminosity Masks and Painting. It was less than four months ago that I published Lab Color and My Workflow du Jour, an article whose title suggests that I’m quite frequently changing how I process images. While I’m still using some of the du Jour techniques and the Silver Efex Pro shortcut as appropriate, I now find I’m more often using another workflow based on luminosity masks. I find them to be extremely powerful, and once mastered, there quite easy to use.

To Be Continued. In Part 2 of this article I’ll explain the next level of luminosity adjustment techniques: luminosity masks and luminosity-mask painting, both of which I first learned from Tony Kuyper. If you can’t wait, see Tony’s articles on Luminosity Masks and Luminosity Painting.

Review: Olympus OM-D E-M5

Nine months ago I reviewed the Sony NEX-7 mirrorless camera (parts one, two and three) and eventually bought one as the small camera alternative to my larger Nikon lenses and bodies (D3s, D800E, D600). It’s been a love/hate relationship ever since. The sensor in the NEX-7 produces great images, but its high-ISO performance isn’t anything to write home about. The lens selection is remarkably weak because Sony’s E-mount is both proprietary and relatively new. A few good third-party lenses are starting to appear but the pickin’s are thin.

My biggest complaint about the NEX-7 is the awful menu system and the so-so controls. It was too easy to hit the video record button by accident, so Sony developed a firmware update that added a menu option to disable the button. But the fact is that many of my best images made over these past nine months were taken with the Sony NEX-7. So how much can I complain?

Buyers Remorse? After spending $2,000 on an NEX-7 body and two lenses, I kept having this nagging feeling that I should have instead gone with a micro four-thirds (M4/3) camera and therefore been able to choose from a much wider variety of lenses. Many friends love their M4/3 cameras so I just had to check one out. After reading a few reviews and asking some of those friends, I decided to rent an Olympus OM-D E-M5 along with two Olympic lenses: a 14-150mm f/4-5.6 superzoom and a 9-18mm f/4-5.6, for a long weekend.

[All images in this post were taken with the Olympus OM-D E-M5, but with a substantial amount of Photoshop and Silver Efex Pro post-processing.]

9-18mm f/4-5.6 at 9mm f/11 ISO 1600 (3-exposure HDR)

Ergonomics. I loved shooting with this camera. It feels good in the hand. The shutter release is responsive. The built-in electronic viewfinder is bright and clear. I actually like it more than the NEX-7’s EVF, which is also very good. One thing I missed, however, was the NEX-7’s focus-peaking feature for manual focusing.

The touch-sensitive rear LCD is terrific. It took a few minutes to figure out how to activate the on-screen touch menu from all modes, but once I mastered that, the menu “buttons” worked great for me. The LCD also tilts both up and down unlike the Sony’s, which only tilts up. I found myself taking many shots with the screen tilted up, holding the camera at knee level. And for someone with old creaky knees like mine, this is a great way to get low angles. I find I can’t do this as easily using the Sony’s LCD because it’s not as bright and is hard to see in daylight. The OM-D’s screen is much brighter.

Another advantage of the OM-D’s LCD is when you want to shoot an image (or video!) holding camera above your head. Because the LCD tilts down, this is easy. On the Sony, you have to hold the camera upside-down. And have you ever tried to rotate video 180 degrees in post-production? It’s not as easy as I thought it would be. Some of the Panasonic M4/3 cameras have LCDs that fully articulate, which I imagine would be even more useful.

The Olympus LCD has two modes that I found surprisingly useful. One is a touch-to-focus feature like you find on many smartphone cameras. But the other mode goes the extra step to focus-and-shoot. It’s fast and responsive and for some situations it’s really handy.

Other Features. The bracketing options are fairly good although the maximum exposure step is only +/-1EV. For the image at the top f this article, I had to shoot five images and delete two of them.

Normally I shoot everything in aperture-priority mode, but I’ve recently been using program (P) mode and auto-ISO for street photography. The OM-D E-M5 makes very good choices in these modes (better than my Nikon D600) and is easy to override for specific situations.

I shot everything in RAW mode, so I didn’t experiment with the scene/picture processing features.

9-18mm f/4-5.6 at 15mm f/8 ISO 400

Lenses. As much as I liked shooting with the camera, I was very disappointed with the resulting images when I offloaded them to Lightroom. All of the images were softer than I expected. They were also fairly flat and low contrast and many exhibited a lot of chromatic aberration (CA). After consulting with Gordon Laing at Cameralabs, I learned I had been testing with a set of lenses known not to be be particularly good.

Of the three lenses I borrowed or rented, the 9-18mm (18-36mm full-frame equivalent) was the best, although still not great. I’m not normally a wide-angle shooter, but I had a lot fun with this lens. It was great for those knee-level street shots.

The 14-150mm superzoom was generally horrible. Yes, I was able to get a usable image (last one in this post), but it took a lot of work in post. I love the equivalent 28-300mm zoom on my big Nikons, but I’d suggest staying away from this M4/3 lens.

I also borrowed an older 14-24mm f/3.5-5.6 — thanks, Janice — and while it was somewhat better than the superzoom, it’s still not a lens I would buy. Of the three, I would only consider the 9-18mm, and even then I’d be willing to pay more money for something a little sharper such as the Panasonic Lumix 7-14mm.

Okay, so much for dumping on these Olympus lenses. On the other hand, I found the in-body image stabilization to work very well. I also like that it’s easy to disable in either or both the horizontal and vertical axes.

14-150mm f/4-5.6 at 58mm f/6.3 ISO 200

Overall. I learned a lot about M4/3 cameras from using the OM-D E-M5, reading other reviews and in particular from Gordon Laing. Some random points:

  • One property of “micro four-thirds” cameras is the use of a 4:3 aspect ratio. I never knew that! I’m so used to a 3:2 ratio from full-frame and APS-C cameras, I found it hard to adjust over the course of just a few days. I usually shoot with printing in mind and I just couldn’t quite get my head around this more-square format. Of course I can crop to any aspect ratio, but I guess I’m just easily confused.
  • There are no Lightroom or Adobe Camera Raw profiles for Olympus M4/3 lenses. I couldn’t figure out why until I learned that the lenses all contain their own profiles and embed them directly into the RAW files. When you open a file in LR or ACR, the application applies the profile to correct the distortion without your even asking. (I wonder if there’s even a way to see a truly “raw” image from these cameras.)
  • Gordon pointed out that Panasonic corrects for CA within their M4/3 bodies, which Olympus does not. Using LR or ACR to correct for CA is a must, at least for the three lenses I used. Even then, you can’t fix it all.
  • As far as good lenses, Gordon says “the action is with the primes”. He likes the Leica 25mm f1.4, the Olympus 45mm f1.8 and although it’s a zoom, the Lumix 7-14mm.
  • Gordon also explained that these small lenses all suffer from diffraction at f-stops tighter than f/4 or f/5.6. Of course, I learned this after I returned my rental gear, but perhaps that explains at least some of my disappointment in the lenses. And as Gordon also reminded me, due to the difference in sensor size, f/5.6 on a M4/3 camera delivers the same depth-of-field as f/11 on a full-frame body. I probably would have done better to shoot wide open or close to it.
  • Finally there’s one feature of the OM-D E-5M that I wanted to play with but never had time: Live Bulb: You shoot in Bulb mode and the LCD shows the accumulated image, updated over time. I can think of all sorts of ways to take advantage of that for long-exposure work.

In summary, what do I think of micro four-thirds in general and the Olympus OM-D E-5M in particular? I think I need to try it again. Next time I’ll get some better lenses and I’ll shoot at wider apertures. And rather than the OM-D E-5M, I may try the Panasonic Lumix DMC-GH3. I’m hearing great things about that body. And of course, by the time I get around to it, both Panasonic and Olympus will probably have announced even better bodies. Once again, it’s all about the glass. The bodies change too quickly.

Silver Efex Pro for Color Images

Over on Google Plus (Facebook, too) I usually list the gear and post-processing apps I use for each image. The other day someone asked my, “Why are you using [Nik’s] Silver Efex Pro for a color image?” A reasonable question I’ll answer here.

For the past few months, Scott Loftesness and I have been researching and experimenting with a variety of post-processing techniques based on replacing RGB channels and using the Lab color mode. Our mentors (actively or passively) are Dan Margulis, Lee Varis and Mark Lindsay. One fundamental concept to all of our work is the separate processing of luminance (brightness) information and color. There are two principal methods for doing this: In Lab color mode the L (luminance) channel controls brightness and has no effect on color, which is managed in the a and b channels. Similarly, if you’re working in RGB color, Photoshop allows you to control luminosity and color separately by using blend modes. Setting a layer’s blend mode to Luminosity means only its brightness information will be used to modify layers below. Likewise, setting a layer’s blend mode to Color will cause its brightness data to be ignore and only its color (hue and saturation) to override what’s below.

Virtually all of the techniques we’ve learned from Dan, Lee and Mark involve steps such as finding and using one or more of an image’s ten color channels (RGB,Lab,CMYK) as a replacement for the overall luminance control of the image. These luminance layers may then be tweaked for contrast, sharpening, etc. Sometimes we also paint (dodge and burn) specific areas in the luminance-only layers. Scott and I have developed pages and pages of notes documenting the various techniques for managing luminance separate from color.

But recently I had a breakthrough. I realized I use Nik’s Silver Efex Pro 2 for virtually all of my monochrome images. It’s an amazing tool for this purpose. Not only can I control the mix of how the RGB and CMY channels contribute to the results, but it gives me terrific control over contrast, brightness and structure. Oh, and it has unique control points that allow one to make most of the same adjustments on isolated portions of an image.

My ah-ha! moment came when I realized that instead of all the more-exotic techniques I’ve been using, I could just use Silver Efex Pro to create the luminance channel for my color images. It’s far simpler than most of the other methods and I already have a lot experience with it. So if you’re using Silver Efex Pro for your monochrome images as well as Photoshop, give this a try.

Below is an original image, pretty much straight out of the camera. (Click on any image to view larger.)

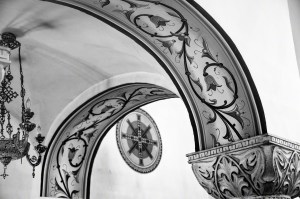
I open this image in Photoshop then duplicate the background layer. I optionally convert the copy into a Smart Object so that I have the ability to go back and change it later. Then I select Filter->Nik Software->Silver Efex Pro 2. After adjusting the b&w image it looks something like the following.

Note some of the luminosity changes I’ve made in Silver Efex Pro:

  • increased overall contrast
  • increased the contrast of the top of the column in the lower-right corner
  • lightened and increase the structure of the bottom of the chandelier on the left
  • darkened the red channel

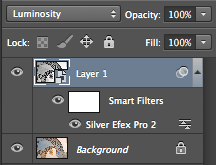
Back in Photoshop, the b&w image is in the layer above the color image. I change the blend mode of this top layer to Luminosity:

The results are the image below:

If I’ve picked up too much noise from Silver Efex Pro — it typically comes from increasing the Fine Structure — I add a low-radius Gaussian Blur to the luminance layer in Photoshop and adjust the opacity of the blurred layer.

You may or may not like the results. That’s okay — I’ve exaggerated everything for the sake of the demonstration. If the effect is too strong, you can simply reduce the Opacity of the top layer. And if you did convert the top layer into a Smart Object you can go back to adjust the results. But I think you’ll get the idea: I’ve used Silver Efex Pro to create an image with the luminosity values I want, then applied that to the full-color image.

Separate from this discussion, but in case you’re curious, here’s what happened to to colors after I enhanced them using the Lab color mode techniques I’ve discussed previously. The difference between the image above and the one below are in color only. They have identical luminosity values.

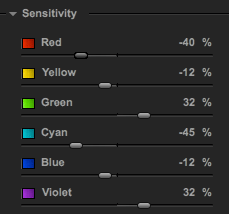
I’ve also developed a consistent workflow within Silver Efex Pro. Specifically, I always start with the color Sensitivity sliders in the Film Types panel:

Adjusting these sliders is similar to Photoshop’s Black & White adjustment layer. You’re modifying the brightness of the areas that are originally brightest in each of the RGB and CMY channels. If, for example, you slide the Red slider all the way to the right and all the others full left, you’re essentially working with just the R channel. But it’s a lot simpler and easier to change than if you have to manipulate the channels in Photoshop. (Sometimes, if the color sliders in Silver Efex Pro don’t seem to have enough range, I boost the color using Lab color mode before going to the Silver Efex Pro filter.)

After settling on the balance of the six color channels, I pretty much work my way top-down in the Silver Efex Pro panel: Brightness, Contrast and Structure. Then I go through the image and add Control Points and adjust them as necessary.

Give it a try and let me know what you think.

Blend Modes in Photoshop

Last week we started an Advanced Photoshop SIG (special-interest group) at our local photo club. Based on a survey of our members, I chose Blend Modes as the topic for our first meeting. Here’s a cleaned-up version of the notes I used in preparation.

Here’s an image of 0%/25%/50%/75%/100% that you can use in a layer to see the monochromatic effects of blend modes. (Public domain. Click to enlarge.)

For example, here’s the above image in Overlay mode over another image. Note that in this mode, black darkens the image, white lightens the underlying image and 50% gray causes no change.

Here are some tutorials and tools:

(Thanks to Scott Loftesnsess for his recommendations to the above list.)

These are some of the techniques I demonstrated:

  • Scrolling Through the Blend Modes: Select the layer you want to change in the Layers palette. Select the Move tool. Use Shift- and Shift+ to scroll through all the blend modes and see their effects.
  • Difference Mode: Just as a demonstration of the more obscure and creative blend modes, set your brush to white in Difference mode at 20% opacity and paint directly on your image or a copy. Now change the brush to 100% and see what happens. (Don’t forget to return your brush’s blend mode to Normal, otherwise you’ll wonder why it doesn’t work correctly later on.)
  • Dodging: Duplicate the image, set to Screen mode, add a black mask and paint on the mask with 20% opacity white.
  • Better Dodging (Levels Adjustment Layer Trick): Duplicating your image in a new layer substantially increases the size of your .psd file, so instead of the above, try dodging this way: Add a Levels adjustment layer set to Screen mode. Paint 20% white on a black mask. Just as easy as above, but your layered files will be smaller.
  • Burning: Add a Levels adjustment layer set to Multiply mode, paint on a black mask with 20% white.
  • Even Simpler Dodge & Burn: All of the above are just experiments to show various options, but perhaps the best way to dodge and burn is to create a new blank layer set to Overlay mode, but don’t change the levels. (It’s just a dummy adjustment layer.) Paint with 20% white to dodge and 20% black to burn. Your file size will be small and the technique is totally non-destructive and reversible. You can erase your adjustments using the Eraser tool or a brush set to 50% gray color.
  • Exposure Control w/Gradient: In a new layer, draw a black-to-white gradient from top to bottom. Set to Overlay mode and adjust the opacity. While this works, you can’t move or change the gradient. So instead…
  • Gradient in a Layer Style: Don’t create a new layer. In the image layer, open the Layer Styles dialog (fx icon at the bottom of the Layers palette or just double-click in the blank space to the right of the layer’s title). Select the Gradient Overlay and (!) check the box. Select a black-to-white gradient (click the Reverse checkbox if necessary), set the gradient style to Linear. Play with Scale and Angle. Then switch the blend mode (of the gradient, not the layer) to Overlay and adjust opacity. Note that you can drag the gradient in your image area to reposition it! Now you have a non-destructive, changeable gradient tool.
  • Vignette in a Layer Style: Like above, but use a black-to-transparent gradient instead of black-to-white and the Radial gradient style. Experiment with the Overlay vs. Soft Light blend modes and the opacity. Unlike Lightroom you can’t change the squareness/roundness of the vignette, but that’s outweighed in some cases by that fact that you can reposition it.
  • Increase Luminosity Contrast: Duplicate the layer, set to Overlay blend mode and adjust the opacity. Works, but it pushes the lights and darks to extremes.
  • Better Way to Increase Luminosity Contrast: Duplicate the layer, from the menus select Image->Adjustments->Desaturate. Change the blend mode to Luminosity and adjust the opacity. You can also use a curves adjustment (to this layer only) to increase the contrast of the desaturated image and even use a mask to selectively add contrast in only certain areas of your image.
  • Even Better Way to Increase Luminosity Contrast: Use the Channel Power Tools plugin (see above) to preview all ten channels (RGB/Lab/CMYK). Select the channel that shows the most contrast in the desired portion of your image. Create a new layer and use CPT to apply the selected channel to that layer. (Or use Image->Apply Image… from the menu.) Select Image->Auto Contrast if necessary to quickly get a contrasty version, particularly if you selected either the Lab “a” or “b” low-contrast channel. Set the blend mode to Luminosity and adjust the opacity. Again, you can apply a Curves or Brightness/Contrast adjustment and a mask as above.
  • High-Pass Sharpening: Duplicate the layer. Select Filter->Other->High Pass… from the menu. Adjust the radius to define edges. Use a curves layer or Image->Auto Contrast or a Brightness/Contrast adjustment layer to increase the contrast, then set the blend mode to Overlay, then adjust the opacity.

I hope you find some of these techniques useful and that they help you understand the power of blend modes in Photoshop. Feel free to leave your feedback here.

Discovering Hidden Color

One of the primary benefits of working in the Lab colorspace is the ability to make very dramatic adjustments to color without affecting luminance. Take a look at the image below, which is pretty much straight out of the camera, a Sony NEX-7. (Click on the images to see them larger. It helps with this discussion.) While it appears dark and drab, you can see there’s some reddish-brown in the structure. When I saw them live, the hanging lights appeared pure white. But as you can see, they not only have a bit of color, but the color appears to vary from light to light.


My goal was to enhance the colors and to create a holiday red-and-green look to the scene. At the same time, I wanted to maintain the green in the small Exit signs. (Yes, you need to click and look at the larger version!)

Lab colorspace to the rescue!

The image below shows what I was able to do with not much more than a Curves Adjustment Layer in Photoshop in the Lab colorspace. I anchored the a & b channels at the zero-zero crossover point. I then steepened both a & b quite a bit to enhance the existing color. From there, I played with the a channel (green-magenta) until I got close to the red and green I was looking for, then added a bit of yellow in the b channel (blue-yellow).

By enhancing the color contrast I was able to bring out the shape and depth of the architecture. I was also able to turn what appeared to be white lights into an array of multi-colored ones. What you’re seeing in the lights is a substantial amplification of the color variations, thanks to very steep a & b channel curves in Lab color.

Note: I also used the ALCE v2 plugin (radius=180) to enhance the local contrast and emphasize the structure of the building.